Find small kitchen design inspiration in this guide, along with essential cost estimates for your kitchen project. Find out the expenses associated with various kitchen components and get information about the starting price of an L-shaped kitchen. Create your dream space efficiently with these valuable insights.
Whether you’re a culinary expert or a newbie in the kitchen, a well-designed culinary space is indispensable. However, two primary challenges often arise the constraints of a compact kitchen and budget concerns. Balancing small kitchen design and cost efficiency is the key to culinary bliss.
In this comprehensive guide, we will help you accurately estimate the expenses involved in your kitchen design project. Also, if you’re working with a compact kitchen, discover expert tips for creating a more spacious appearance and check out the excellent compact kitchen designs by Livspace for inspiration.
Table of Contents
Calculating the Cost of Your Dream Kitchen
Before diving into your interior project, determining the budget is paramount, especially for small kitchen designs. Various factors can affect the cost of your kitchen, and we’ll highlight some of them below to help you plan effectively.
kitchen size
scope of work
Materials used
Additional Kitchen Accessories
Scope of Work
Cost Range*
Notes
Modular
₹1,60,000 to ₹1,76,000
Parallel kitchen design with modular cabinets and fittings
Flooring
₹130 to ₹250 per sq. ft.
Flooring will be present beforehand in most cases. The price mentioned is for a renovation done with cost-effective options like tiles instead of something expensive like marble
Ceiling
Paint – ₹22 to ₹30 per sq. ft. Gypsum – ₹180 to ₹250 per sq. ft.
Gypsum false ceiling including electricals
Backsplash/Dado
Tile Base Price – ₹60 to ₹250 per sq. ft. Imported Tiles – Upto ₹1000 per sq. ft. Installation Charges – ₹120 to ₹200 per sq. ft. Backpainted Glass – ₹600 to ₹950 per sq. ft.
Imported tiles come with special finishes. Installation charges will vary based on size and pattern of tiles. Granite and quartz are other backsplash material options
Countertop
Quartz of Brand Kalinga Stone – ₹48,000 to ₹1,08,000 per slab Granite – ₹750 to ₹900 per sq. ft.
For quartz, the size dimensions are 3.15m x 1.45m. Cost for both includes transportation and installation. Cost varies due to material cost
Electricals
₹12,000 to ₹18,000
Includes electrical points for hob, chimney, Aquaguard, OTG, fridge, microwave and light points, if needed
*All prices mentioned in this article exclude 18% GST.
These estimated prices are approximate. The actual cost of your kitchen design may vary depending on factors like your city, labor charges, materials, design complexity, and size of the kitchen.
Cost Estimating by Kitchen Size: A Guide
The size of your kitchen affects the cost significantly. Consider these approximate price ranges for kitchens of different sizes.
Kitchen Size
Cost Range*
Small (6ft by 8ft)
₹1,32,174 to ₹1,53,458
Medium (8ft by 10ft)
₹1,69,200 to ₹1,99,253
Large (10ft by 16ft)
₹2,36,580 to ₹2,75,454
Please note: The prices mentioned are starting estimates covering modular cabinets and fittings only, excluding 18% GST and handling charges. Your final kitchen design cost may fluctuate depending on factors such as location, labor costs, material choices, design complexity, and kitchen dimensions. It is important to take these variables into account in your budget planning.
Estimating Costs for Your Kitchen Layout
In kitchen design, four primary layout options exist, with the L-shaped configuration being the preferred option in India. To increase storage or countertop space, consider incorporating a peninsula or island into your kitchen design. These versatile layouts cater to different needs and preferences.
Kitchen Layout
Cost Range*
One Wall
₹1,57,691 to ₹1,73,460
Parallel
₹1,60,000 to ₹1,76,000
L-Shaped
₹1,44,256 to ₹1,58,682
U-Shaped
₹1,66,519 to ₹1,83,170
Please note that the prices mentioned represent preliminary estimates, including only modular cabinets and fittings, exclusive of 18% GST and handling charges. Your kitchen design expense can fluctuate depending on factors such as location, labor rates, material choices, design complexity, and dimensions of your kitchen. It is important to consider these variables when planning your budget.
Cost-Cutting Tips for Small Kitchen Design
Creating the kitchen of your dreams may be constrained by your budget. Explore affordable options for limited budgets while exploring high-cost investments that enhance convenience and aesthetics. With these options, you can bring your kitchen vision to life, regardless of your financial constraints.
Budget Finish
Laminate
Cost-Effective Countertop Material
Granite*
Economical Backsplash Material
Tiles**
Economical Investments
Basic shelf and drawer units
high cost smart investments
specific units such as Pantry Unit, Tambour Unit, Magic Corner units and wicker baskets
Consider jet-black granite for its low maintenance. Opt for 1×1 or 2×2 square-patterned tiles for a budget-friendly choice.
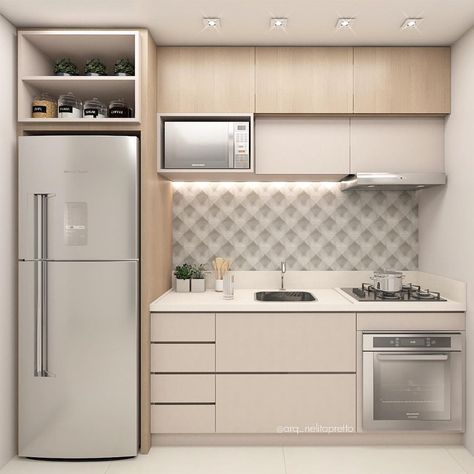
Maximizing Space: Small Modular Kitchen Design
Small kitchen interiors are common in modern flats. Follow these clever tips to create the illusion of spaciousness in your small kitchen design.
Neutral Colours – Light colors like white, beige and cream can create a bright, airy atmosphere, visually expanding the space of a compact kitchen.
Reflective Finishes – Opt for shiny, reflective finishes to create the illusion of space in small rooms.
The mix of Open and Closed Cabinetry – Balancing closed shelves with open shelves in your kitchen adds a sense of spaciousness while preserving functionality.
Simple Dado Design – In small kitchens, stay away from bold designs. Instead, choose simple backsplash designs in neutral colors to promote a sense of spaciousness and harmony.
Maximum Lighting – In addition to natural light, incorporate various artificial lighting elements like spotlights and under-cabinet lights to illuminate and enhance the functionality of your kitchen.
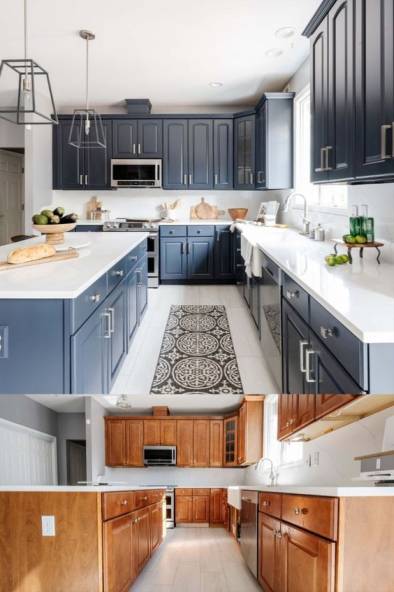
Space Saving Ideas: 10 Small Kitchen Designs
Looking for small kitchen inspiration? Check out sleek Livspace designs designed for spaces under 100 square feet. Discover innovative ideas for compact kitchens.
#1. Transforming Spaces: L to C-Shaped Kitchen
Size: 100 sq. ft. approx.
In this small kitchen makeover, we have maximized the space by removing the existing RCC lofts and optimizing the layout for functionality and aesthetics.
Additionally, we replaced the old L-shaped counters with C-shaped counters, significantly expanding the workspace available in kitchen design.
#2. Small Kitchen Secrets: Adding Extra Countertop
Size: 100 sq. ft. approx.
In this Indian-style small kitchen design, an additional counter near the window cleverly accommodates three cooks, optimizing functionality and making food preparation easier.
The parallel layout fits effectively into a long, corridor-like space.
#3. Compact modular kitchen design
Using a light color palette enhances the openness of the kitchen and creates a huge visual impact.
Incorporating ample white on countertops and floors contributes to the open and airy aesthetic of the space.
To optimize storage, our designers integrated both open and closed storage racks, along with wicker baskets and spice racks.
#4. Smart small kitchen: adding extra utility
The parallel layout creates additional cooking and preparation space, which is enhanced by an additional utility counter at the end of the aisle.
Size: 100 sq. ft. approx.
In this Indian style small kitchen design, our designer preserved the parallel layout while introducing an additional utility area at one end for enhanced functionality and convenience.
This expansion added additional length, resulting in a more functional and spacious area for both food preparation and cooking.
#5. Max Walls: Modular Kitchen
In limited spaces, choose thin spice racks for efficient storage.
Size: 70 sq. ft. approx.
Maximizing wall space with wide cabinetry in this small kitchen design creates the illusion of a longer and more spacious ceiling.
Furthermore, the combination of light and dark wood colors enhances the spatial openness in this kitchen design.
#6. Small space, big comfort: senior friendly kitchen
From a dark and uninspiring space, we have made a remarkable transformation, introducing features that ensure safety and accessibility of the kitchen for senior citizens.
Size: 75 sq. ft. approx.
The elderly benefit from cabinetry equipped with user-friendly grip handles for effortless use.
To prevent kitchen accidents, anti-skid flooring ensures safety and stability.
#7. Indian Cooking-Focused Design
The dark blue color on the lower cabinets protects against curry stains, and the kid-friendly anti-scratch acrylic finish ensures durability and longevity.
Size: 100 sq. ft. approx.
This compact kitchen design is perfectly tailored to suit the demands of Indian-style cooking.
A white color palette expands the kitchen, complemented by dark lower cabinets to protect against unsightly Indian curry stains and oil spills.
Easy-to-clean anti-scratch acrylic cabinetry paired with a Moroccan tile backsplash to protect against oil stains, ensuring both convenience and style.
White quartz countertop, despite its color, is low-maintenance due to its non-porous nature, which offers resistance against stubborn stains.
#8. Maximizing Space: Parallel Kitchen Design
Vibrant lime green accents, when paired with a neutral backsplash and wood floors, enhance the overall aesthetics of the kitchen, creating a striking visual impact.
Size: 100 sq. ft. approx.
Indian-style modular kitchen design ideas in parallel layouts effectively optimize the available workspace.
Efficiently equipped with storage solutions, this small kitchen follows the golden triangle rule, ensuring an ergonomic and functional layout.
#9. Small Modular Kitchen: Perfect Vastu Design
As per Vaastu principles, it is important not to place the hob (fire) and sink (water) next to each other.
Size: 90 sq. ft. approx.
In line with Vaastu principles, the use of yellow color symbolizing sunlight and fire ensures compliance in this Indian kitchen design.
In following Vaastu principles, placing the hob and sink on separate counters complies with the rules governing fire and water elements.
#10. White Magic: Stylish, Small, and Low-Maintenance
Adopting an all-white theme gives an airy and spacious feel to this compact kitchen, creating an inviting and open ambiance.
Size: 100 sq. ft. approx.
All-white cabinetry creates the illusion of spaciousness in this small kitchen design.
The G4 stone countertop is resistant to stains, while the anti-scratch properties of the acrylic cabinets make this kitchen design easy to clean and maintain.
How Can dpod studio Help You?
dpod studio Kitchens feature DuraBuild cabinets, featuring AquaBlock and AntiBubble technologies, backed by precision-engineered manufacturing for top quality and durability.
Explore our wide range of kitchen designs with a solid 10 year warranty* for both modular and semi-modular products.
We meticulously subject our kitchens to 146 quality checks, guaranteeing exceptional quality and craftsmanship in every detail.
*Applicable to specific finishes on modular products. To review complete warranty terms, visit https://thedpod.com/.
For a breathtaking kitchen design, your search ends here. Schedule an online consultation with DePod Studio today. Check out dpod studio reviews to see how our customers have experienced working with us.
Your feedback matters! Feel free to share your ideas or suggestions with us at sales@thedpod.com. We’re here to listen and help.
Disclaimer: Please note that all content in this story is accurate at the time of publication. References to costs, budgets, materials, finishes and products from the dpod studio collection are subject to change as per current rates. Additionally, featured designs may vary depending on year of construction of the home and availability. We encourage you to consult with our designers for the latest information regarding pricing, availability and the latest design offerings.
Real Storage Problems – From optimizing cabinet storage to pantry organization, affordably revamp your kitchen with these simple space-saving ideas. Increase efficiency without breaking the bank!
At the heart of every home, the kitchen reigns supreme, witnessing a whirlwind of daily activities. Still, inadequate storage can disturb this important space. no fear! Our unique kitchen storage solutions will eliminate clutter and transform your culinary haven into an organized oasis, freeing your everyday life from the clutches of chaos. Say goodbye to kitchen storage problems with our expert advice!
Discover common kitchen storage problems and simple solutions on our blog. Deal with clutter like a pro with our expert tips!
Table of Contents
Real Storage Problems #1: Accessing Cooking Essentials in a Flash!
When we say “essentials,” we’re talking about the flavor-packed heroes of the kitchen: spices, seasonings, oils, sauces, herbs, and more.
Solution: Open Storage
Discover the balance between closed and open storage on our blog. Closed storage exudes charm and low maintenance, while open shelves provide quick access during busy mornings. Achieve perfect harmony for a stress-free kitchen experience!
Stuck in Problem #2? Taking kitchen accessibility mastery to the extreme!
Typically, this is an overlooked corner space in an L or U-shaped kitchen. Explore how to maximize this often underutilized area.
Revolutionize your kitchen with corner carousel units: the best storage solution!
Don’t be fooled by its perceived expense; This kitchen gem is a game-changer. Those tricky corner spaces that often go to waste find new life with rotating shelves. Unlock hidden potential effortlessly!
Cracking the Code of Kitchen Storage: Conquering Problem #3 – Pots and Pans Space!
Visual accessibility—no need to search for essentials; It’s right in front of you!
Hooks, racks, or magnetic strips: your secret weapons for a clutter-free kitchen!
While pots and pans may fit on shelves, a comfortable fit and visibility are important for daily convenience. Find efficient storage solutions that make your cookware easily accessible and perfectly organized.
Increase your kitchen efficiency with three simple storage solutions! Embrace the convenience of pot and pan hooks, keep frequently used cookware at arm’s reach with a dedicated rack, or go high-tech with magnetic straps for seamless wall access. Explore these game-changing ideas for a well-organized culinary space!
Ingredient hunting no more! Solution to Problem #4: Organizing Your Kitchen for Easy Access
Finding ingredients is a common problem in shared kitchens. Find out how a well-structured storage system can save the day, ensuring you’ll always have what you need – even if things wander from their intended place!
Kitchen Magic: Solve the Storage Puzzle with a Tall Unit and Pantry Pull-Out Solution!
Simplify your kitchen storage strategy with a game-changing solution – a tall cabinet. With enough space to hold all your groceries, you’ll never misplace items. Explore the convenience of the Pantry Pull-Out, a brilliant cabinet innovation designed to easily hold and organize all your spices. Say goodbye to kitchen clutter!
Countertop chaos ensues! How to Overcome Problem #5 and Keep Your Kitchen Clean
A cluttered countertop often results from an overabundance of tools and essential items. Organize your space for a cleaner, more efficient kitchen.
Wall-mounted wonder: A solution to clutter with built-in appliances
Customize your kitchen design with built-in appliances and wall-mounted essentials like knives and chopping boards. Create ample prep space and a sleek, clutter-free countertop for a functional and stylish culinary haven.
Solution to try: Tackle problem #6 and keep everyday vegetables neatly stored!
Uncover creative options for storing non-refrigerated vegetables without sacrificing precious floor space. Explore innovative ideas to keep your kitchen efficient and visually appealing.
Wicker Wonders: The Ultimate Solution For Stylish And Organized Storage!
Explore the wonders of wicker baskets, the modern kitchen storage revelation. These breathable wonders retain the freshness of vegetables, are lightweight and easy to clean. Perfectly suited for modular setups, they seamlessly blend aesthetics with functionality, making them the ideal choice for your modular kitchen storage needs. Step up your kitchen game with these versatile baskets!
The Spoonful Solution: Conquering the Chaos of Missing Utensils – Problem #7 Solved!
For those elusive forks, soup spoons and beaters – smart kitchen storage solutions could be the answer you’ve been looking for.
Cutlery chaos no more: The ultimate solution – get the solution from Cutlery Tray!
Say goodbye to cutlery chaos with the Simple Cutlery Tray! This clever accessory has slots for a variety of utensils, ensuring you’ll always have what you need in one convenient place. And for those who have an extensive cutlery collection, don’t hesitate to double up – keep two trays in separate drawers to prevent a never-ending battle of spoons and forks for space in your kitchen. Have harmony and organization at your fingertips!
Protecting Precious China: Solving Problem #8 with Style and Care
Stacking your utensils on top of each other? It’s time to break that habit to create a more organized and efficient kitchen!
Elevate Your Dining Experience: Problem-Solved with Thali Basket Solutions!
Customize your kitchen’s bottom drawer with a game-changing addition – the thali basket. This innovative stand creates space between plates, preventing collisions and chips, and ensuring your dinnerware stays pristine and organized.
Raise a Glass to Storage Solution: Conquer Problem #9 with Class!
Are you tired of the dust-coated glasses of your cabinets? Learn how to keep your glassware shiny, clean, and ready to use with our kitchen storage tips!
Sip in Style: The Reverse Solution to the Glassware Storage Problem!
Eliminate dusty glasses with a simple but effective storage hack – hang them upside down! This clever solution not only keeps your glassware pristine but also reduces the risk of them shattering by keeping them safely away from the cabinet. Discover the art of dust-free, chip-free glassware storage today!
Appliance Overload: Regain Your Kitchen’s Counter Space with Problem #10 Solution!
Storing tools on your countertop can hinder easy access to them when needed. Find space-saving solutions for a clutter-free and efficient kitchen setup.
Maximizing Space and Efficiency: Keep appliances hidden in your tall unit for the ultimate solution!
Tackle kitchen storage challenges with a dedicated tall unit for your appliances. Ideal for grinders, mixers and ovens, this vertical storage solution ensures easy access while hiding visual clutter and preserving valuable counter space. Streamline your kitchen and keep your tools at your fingertips with this smart organizational strategy!
Sleek & Space-Saving: Problem #11 solved with a streamlined 4-burner gas stove!
In today’s urban kitchen, is a freestanding 4-burner gas stove the best choice for increasing cooking efficiency and style? Explore the pros and cons on our blog.
Kitchen Makeover: How Built-in Hobs/Gas Stoves Can Save Your Cooking Space!
In our time-crunched lives, efficiency in the kitchen is a top priority. The 4-burner gas stove is a boon, enabling multitasking without compromising on culinary variety. Still, in compact urban kitchens, a freestanding 4-burner stove can create clutter. Visit our blog to strike the right balance between convenience and aesthetics in your modern kitchen.
Explore a unique but important modular kitchen storage concept—built-in hobs or gas stoves. These innovative additions not only streamline your cooking space, but also hide unsightly wires and cables, maintaining the sleek and clutter-free aesthetics of your modern kitchen. Learn how to seamlessly blend style and functionality in your culinary space on our blog.
Upgrade your kitchen with built-in hobs that offer a sleek, contemporary look while providing modern convenience. Say goodbye to lighters and matchsticks, as these hobs boast a pulse ignition feature, making cooking faster, safer and more efficient. Elevate your culinary experience with our latest kitchen innovation insights on the blog!
Want to know how dpod studio can help you? Check out our blog to learn how we can make your life better!
Unlock the potential of your kitchen with our huge selection of over 2 million catalog products. Customize and upgrade your space with ease!
Rely on our expert designers to create a home tailored to your specific needs and lifestyle, guided by the best design principles. Your dream destination is our mission!
Trust us for excellence – Our materials are top-tier, branded, precision-engineered, and undergo rigorous 146-point quality assessment. Your satisfaction is our commitment!
Are you ready to dive deeper into the space of your dreams? Schedule an online consultation with dpod studio today. Your ideas and suggestions matter to us—contact us at sales@thedpod.com. We’re here to listen!
Kitchen With Vastu-Approved – Discover the best kitchen color selection guide based on Vastu principles. Find the ideal color for each kitchen section and stay away from unfavorable choices.
Are you curious about the ideal kitchen color per Vastu principles? While white is a popular choice, there are lesser-known colors that are equally suitable. Here’s a glimpse of popular Vastu-approved colors that can complement your kitchen beautifully, to help you make an informed decision.
Check out our list of colors to avoid, along with our particular recommendations for countertops, walls, and floors. Make sure to read till the end to make sure you don’t miss any vital information!
Table of Contents
Kitchen With Vastu-Approved : Discover The Best Allusions For Positive Energy
Highlight the recommended kitchen colors as per Vastu principles. Dive into our concise guide that explains the symbolism behind each color to help you transform your kitchen in the perfect hue.
Vastu Colours
What do they symbolize
Orange
Optimism
White
Purity and Positivity
Green
Hope and harmony
Red
Happiness
Yellow
Energy and freshness
Pink
Love
Chocolate Brown
warmth and satisfaction
Peach
Softness and Nutrition
Metallic Hues
Productivity and peace
Beige
Peace and Relaxation
Next, we’ll look at the intricacies of each color:
Orange
Orange is a vibrant color that promotes optimism and enhances relationships, making it an excellent choice for a minimalist kitchen. Additionally, saffron orange symbolizes strength and courage, while light brick orange evokes energy and excitement.
Not only is orange a great choice for a southeast kitchen as per Vastu, but it also provides positive energy. Armed with this knowledge, you can now confidently choose a kitchen color that suits your preferences and creates the desired ambiance in your space.
White color kitchen
White, which is considered a pure and positive color as per Vastu principles, symbolizes cleanliness and brightens up the kitchen. Its association with lighting further enhances its suitability, making it an ideal choice for functional and harmonious kitchen environments.
To enhance the energy of your kitchen, embrace the power of white, the kitchen top color as per Vastu. Especially if your kitchen faces the North-West direction, choosing a white color will enhance the positive energy and create an auspicious atmosphere in your culinary space.
Green color kitchen
Don’t ignore green while choosing kitchen colors according to Vastu. A symbol of hope and harmony, it blends seamlessly with nature and infuses a serene atmosphere in your kitchen. Embrace the soothing power of green to create a harmonious and refreshing cooking environment.
Incorporating green elements like a kitchen island is in line with Feng Shui principles, giving you added benefits. According to Feng Shui, the color green promotes healthy digestion, making it a wise choice for enhancing both the aesthetic appeal and overall well-being in your kitchen.
Red color kitchen
In Hindu scriptures, the color red is associated with the element of fire and is believed to bring happiness and fortune when used in kitchen decor, according to Vastu principles. Adding red color to your kitchen design generates positive energy, creating a vibrant and auspicious environment.
The red kitchen symbolizes resilience in the face of life’s challenges. Additionally, if your kitchen faces the southeast, then choosing red as your color of choice is a smart decision that is in line with Vastu principles.
Yellow color kitchen
For a kitchen-friendly color selection, look no further than yellow. Vastu suggests that the color yellow communicates energy, freshness and happiness, which are important elements for creating a positive and vibrant environment in your kitchen.
Ideal for kitchens lacking direct sunlight, yellow mimics the warmth of natural light without harsh reflections, creating a relaxing ambiance. It is the perfect color choice to give your kitchen a welcoming and bright ambiance.
Choose yellow as the ideal Vastu color for a dimly lit kitchen. Its positive energy and ability to evoke happiness make it an excellent choice to brighten up and enhance the ambiance of your kitchen.
Pink color kitchen
When it comes to choosing pastel shades in line with Vastu principles, pink is the leader in kitchen colours. A symbol of love, it symbolizes the dominant spirit in the kitchens of joyous homes where people gather, enjoy delicious food and share meaningful conversations.
To enhance the joyful atmosphere and extend it to your entire home, it is highly recommended to include a touch of pink in your kitchen. A harmonious mix of pink, crisp white and vibrant red comprise the essential Vastu colors for the kitchen, further enhancing its suitability.
Chocolate Brown color kitchen
Although chocolate is not a common choice, chocolate is an excellent kitchen color as per Vastu principles. It creates warmth and satisfaction, creating a space brimming with positive emotions that ensure an enjoyable culinary experience.
For south-west facing kitchens, earthy tones are an ideal choice, complementing modern kitchen designs flawlessly.
Peach color kitchen
Choose a warm and delightful shade of peach to enhance the ambiance of your kitchen. Peach is recommended as a kitchen color in Vastu, which promotes strong family ties and symbolizes peace, tenderness, and nourishment.
Metallic Hues color kitchen
Integrating metal elements in the kitchen promotes productivity, calmness and clear thinking. Enhance these features by creating a cohesive and functional space by incorporating metal accents in hardware such as light fixtures, drawer handles and faucets.
Beige color kitchen
Apart from the above-mentioned colours, light colors are also preferred as kitchen colors in Vastu for Indian homes. If you prefer a neutral color other than white, beige is an excellent choice, providing a subtle and versatile color option for your kitchen.
Are you looking for design inspiration for your kitchen using these colors? Explore our collection of modular kitchen design ideas for creative inspiration and innovative solutions.
Vastu Vibes: Avoid These Kitchen Colors For Harmonious Energy
Now that you are aware of the recommended kitchen colors as per Vastu, let us know about the colors that you should stay away from.
Black
Dark Grey
Dark Brown
Purple
To ensure a Vastu-compliant kitchen, it is advised to avoid dark colors. Choose neutral or pastel colors for a harmonious and balanced ambiance in your culinary area.
Vastu-Approved Kitchen Platform: Discover The Best Colors For Positive Energy
Vastu Shastra stresses on the importance of choosing the right material for your kitchen platforms and slabs. As per Vastu principles, natural stones like quartz and granite are highly recommended, which ensure a harmonious and balanced kitchen environment.
Looking to add a touch of sophistication? Consider wood for a luxurious touch. Choose neutral colors such as beige, wood tones or white for your kitchen slabs to achieve optimum results and create a stylish aesthetic.
Vastu-Approved Kitchen Flooring: Discover The Best Colors For Positive Energy
Adhere to vastu guidelines by selecting ceramic, wooden, or marble tiles for your kitchen floors. Avoid dark colors that may attract negative energy, promoting a positive and harmonious environment in your kitchen.
Choose a light brown, cream or beige color for your kitchen floor, as these colors bring stability and warmth to family relationships, making them ideal choices for a harmonious kitchen environment.
Vastu-Approved Kitchen Cabinets: Find The Best Colors For Positive Energy
Create an eye-catching aesthetic and create a positive vibe in your kitchen by incorporating two or three carefully chosen colors into your cabinet design. Choosing the right colors for your kitchen cabinets can really enhance their overall look and feel.
When choosing kitchen cabinet colors, make sure they align with the colors recommended for the direction of your kitchen. Here is a handy guide to help you choose the right cabinet colors as per Vastu principles.
North-facing kitchen: Blue, green and brown
South and South: East-facing kitchen: Red, maroon, pink, orange, or brown
West-facing kitchen: Silver and white
The magic of kitchen color: find the ideal colors for walls and furniture
To create a calming ambiance, choose light colors on your kitchen walls and furniture. Avoid bold or dark colors for the walls as they can make the space look cluttered and heavy. Choose calming colors to promote a calm and inviting kitchen environment.
To get a well-curated look in line with Vastu principles, consider wooden finish furniture. Wood is a recommended material and its neutral tones match beautifully with lighter-colored walls, creating a harmonious and balanced aesthetic in your kitchen.
Unlock Your Creative Potential: Learn How dPod Studio Can Help You
Discover our wide range of kitchen options to suit any style or budget. Whether you want a budget-friendly, premium or semi-modular kitchen, we prioritize high-quality materials and engineering. Rest assured, your kitchen will be built with lasting functionality and timeless appeal.
Please note that the information in this article is accurate at the time of publication. Costs, budgets, materials, finishes and products mentioned in the DPod Studio catalog may vary based on current rates and design. For the latest pricing and availability, we recommend consulting with your designer for more detailed information.
FAQs
Q1: What is the significance of choosing Vastu-approved colors for the kitchen?
A: According to Vastu Shastra, colors have an impact on energy flow and can influence the overall harmony and positivity in the kitchen.
Q2: Which colors are considered best for kitchen walls and furniture as per Vastu?
A: Ideal colors for kitchen walls and furniture as per Vastu include earthy tones like white, cream, beige, light yellow, light green, and pastel shades.
Q3: Are there any colors to avoid for kitchen cabinets as per Vastu?
A: It is recommended to avoid dark or black colors for kitchen cabinets according to Vastu principles.
Q4: Can I incorporate multiple colors in my kitchen as per Vastu?
A: Yes, you can use a combination of Vastu-approved colors in your kitchen to create a balanced and harmonious atmosphere.
Q5: Why is choosing the right color for the kitchen platform important as per Vastu?
A: The color of the kitchen platform, according to Vastu, can influence the overall energy and positivity in the kitchen space.
Q6: Which color is considered the best for kitchen platforms as per Vastu Shastra?
A: Vastu recommends using light or pastel shades like white, cream, beige, light yellow, or light green for kitchen platforms.
Q7: Can I choose a different color for the kitchen platform than the walls?
A: Yes, you can opt for a different color for the kitchen platform as long as it aligns with the Vastu principles of positive energy flow.
Q8: Are there any colors to avoid for kitchen platforms as per Vastu?
A: It is advisable to avoid dark or black colors for the kitchen platform, as they are believed to create heavy or negative energy in the space.
Finally, when it comes to designing your kitchen as per Vastu principles, dpod Studio is your preferred interior design company in Ahmedabad. We offer a wide range of kitchen colours, materials and finishes to suit every style and budget. Our expert team ensures that your kitchen not only adheres to Vastu guidelines but also stands the test of time with high-quality materials and impeccable craftsmanship. Contact us today for a consultation and let us create the perfect kitchen space for you.
Find out the best interior design cost for your 4BHK in Ahmedabad. Learn about budget-friendly options and premium services to create your perfect home.
Discover the Interior design cost for 4bhk in Ahmedabad. Our expert designers provide tailored solutions to enhance your living space considering your budget. Take a look at pricing, trends, and trends to create a stylish and functional home. Get to know about the ideas. Contact us today. Get a personalized quote and turn your 4BHK into a dream paradise.
Embarking on the journey of designing a spacious abode can often lead to a feeling of bewilderment. The task of designing an awe-inspiring interior for your 4BHK abode involves many aspects including considering the costs involved in the 4BHK flat interior design process. This is mainly because of the specific requirements that come with 4BHK apartment or villa designs, which makes them different from contemporary villa designs. However, fear not! We present to you an in-depth exploration that is within reach to effortlessly calculate the expenses associated with your dream Villa House Design or 4BHK Flat Interior Design project.
Table of Contents
Unveiling the Aesthetic Divide: Exploring Contrasts in Design Costs between a Luxurious 4BHK Flat and a Cozy 4-Room Small Villa
Are you worried about the disparities between the cost of designing a beautiful villa and a lavish 4BHK flat? Let’s get into the interesting realm of financial comparisons. In India, the average cost of building a 4BHK flat design usually ranges from ₹1,200 to ₹1,700 per sq. ft. In contrast, when stepping into the realm of 4BHK house designs, the minimum expenditure increases to ₹1,500 per sq. ft. As a result, it becomes clear that the financial outlay for the design of villas leans towards the higher end of the spectrum.
How Does a 4BHK Flat Interior Design Cut Down Costs?
Want to know about the cost-based benefits that await you when you choose to invest in 4BHK Flat Design? Let us look at some of the attractive benefits:
One of the exceptional advantages of choosing a 4BHK flat design is the pre-defined demarcation of spaces including bedrooms, kitchens, bathrooms, and others. This strategic layout not only enhances functionality but also eliminates the need of hiring an architect to create a customized 4BHK house plan. By taking advantage of these designated locations, you can save a lot on expenses, while ensuring a budget-friendly approach to your dream home.
When you choose a 4BHK flat, you can avail the basic facilities provided by the construction company or builder. These essential fixtures and fittings are seamlessly incorporated into your home, with the associated cost already included in the final amount. This inclusive feature ensures that you can optimize your spending without requiring additional outlay on these basics. Embrace the convenience and financial ease of a 4BHK flat, where the construction company takes care of the necessary installations, allowing you to focus on transforming your space into a personal haven.
Customize your new house to align with your preferences and enjoy long-term cost savings. From flooring to plumbing and electrical points, personalization empowers you to make informed decisions, improving quality and efficiency. By strategically planning these elements, you can optimize energy consumption, lower utility bills, and reduce future maintenance costs. Embrace the opportunity to create a space that reflects your style while reaping the benefits of reduced expenditure.
Customize your kitchen and cupboards with a few construction companies/builders, and save on cost while adding personal flair. Choose materials, layouts, and finishes to suit your vision, avoiding the need for outside contractors. Take advantage of this opportunity to build a suitable home without breaking the bank.
Why can the cost of 4-room villa interior design be high?
Owning an independent house is a dream of many individuals. As you embark on this exciting journey, it is imperative to delve deeper into the cost-based factors that require careful consideration. Let us take a look at the financial aspects that warrant your attention, paving the way for an informed and budget-conscious decision.
To truly unleash your vision and design the perfect home, 4BHK house plans customized by an architect are essential. This gives you complete freedom to shape your living space as per your choice. However, it is important to consider the associated costs, as architects typically charge fees ranging from ₹60,000 to ₹2,00,000 for preparing these meticulous plans. This investment ensures that your dream home becomes a tangible reality, carefully designed to suit your specific needs and aspirations.
Embarking on the ambitious journey of designing a 4BHK home completely on your own brings with it an added responsibility – the financial burden of sourcing construction materials. As the visionary behind every aspect of your project, you must consider the necessary materials needed and allocate funds for the construction process. From cement and bricks to flooring materials and fixtures, these expenses are an important component of making your dream home a reality. By diligently taking material costs into account, you ensure smooth progress toward turning your dreams into a tangible reality, reflecting your personal taste and style.
In your careful planning for 4BHK home design, it is imperative to consider various expenses associated with electrical work, plumbing, water pipes, and additional civil work. These important components play an important role in ensuring the functionality and comfort of your future home. Therefore, it is essential to allocate funds accordingly for the professional services, materials, and labor required to perform these tasks efficiently. With these expenses in mind, you can proceed with your project with financial prudence, guaranteeing a complete and harmonious living space that meets and exceeds your expectations.
As you embark on the construction journey of your dream 4BHK home, it is important to note that all the expenses related to the construction of the walls and pillars of the rooms are within your purview. This includes the cost of materials, labor, and any special services required to erect strong and visually appealing walls and pillars throughout your home. By taking on this responsibility, you ensure the integrity and aesthetic appeal of your living spaces, tailoring them to your unique preferences. Seize the opportunity to design a structurally sound and visually stunning home, with the cost of building the room’s walls and pillars in your capable hands.
Unraveling the Secrets of Bespoke Luxury: Decoding the Price Tag of Transforming Your 4BHK with an Interior Designer
When it comes to determining the cost of hiring an interior designer, the answer can vary from professional to professional. However, there are essential factors to consider when calculating expenses. Let us explore some of the key aspects that contribute to the overall cost estimate:
The cost of interior design varies between designers. Design services alone usually range from ₹10 to ₹100 per square foot. Incorporating additional elements such as carpentry, furniture and civil work can increase the cost by ₹2,000 to ₹3,000 per sq ft. It is important to discuss your budget and requirements with your designer for a transparent and informed financial arrangement. Early communication enables effective budget planning, ensures harmonious collaboration and ensures the realization of your design vision.
Designers may charge a percentage of the total cost of the home, usually anywhere from 5% to 20%. This approach considers the overall project expenditure. It is important to discuss fee structures with your designer to find the best arrangement. Clarify your budget and expectations to strike a balance between design excellence and financial feasibility. Remember, designers may have different billing approaches, so open dialogue ensures a cohesive design journey.
In addition to service fees, designers can apply markups to project products. This markup represents a premium fee to cover the sourcing and coordination efforts. The percentage of product markup can vary, typically from 10% to 30% or more. Open discussion about markup ensures clarity on costs and helps align expectations and budget. Effective communication with your designer is essential to a balanced and mutually beneficial design experience.
Interior designers in India use a variety of charging methods, such as percentage-based fees, per square foot interior design cost, commission-based fees, or a combination thereof, depending on their preferences and project requirements. To understand the full scope and associated costs of hiring an interior designer, we recommend researching fee structures and pricing considerations. Equipping yourself with this knowledge helps in making informed decisions and finding a designer that aligns with your vision and budget, ensuring a productive and satisfying partnership.
Factors Affecting The Cost Of 4BHK Interior Design
On undertaking a 4BHK interior design project, the estimated cost is usually around ₹36,00,000. However, it is essential to note that this figure can fluctuate depending on a number of critical factors, including the size of the venue, the complexity of the design, the choice of materials and finishes, the scope of work involved, the extent of customization involved, Furniture selection and furnishings, electrical and plumbing requirements, hiring of additional professionals, and geographic location. Considering these factors will help you obtain a more accurate cost estimate tailored to your project needs.
1. Location
The cost of 4BHK interior design can be greatly influenced by the location of your property. Expect to spend more for a 4BHK flat interior design located at a prime location of the city as compared to one located on the outskirts. The same principle applies to 4BHK home designs as well. Geographical location plays a significant role in determining overall cost, which emphasizes the importance of considering location-specific factors when estimating the expenses involved in your project.
2. 4bhk house plan size
In the area of 4BHK house designs, it is a matter of simple maths – the bigger the area, the higher the cost. A spacious 4BHK layout requires more raw material and labour, thereby increasing the overall expenditure. It is important to note that the size directly impacts the cost of 4bhk house designs.
3. Structural Changes in 4 BHK House Design
Let’s imagine a scenario where you acquire an under construction 4bhk flat design located in the bustling center of the city. The layout appears ideal, but one requirement is missing—the desire for an open kitchen. However, at this stage of construction, with the walls already erected, modifying the structure to accommodate an open kitchen incurs additional costs. The builder can make the requested changes, but at a cost. This example highlights how a structural change can affect the overall cost of a project, emphasizing the importance of considering such factors when making design decisions.
When it comes to structural changes to interior design, a variety of modifications can be made, from knocking down walls to replacing units or implementing carpentry changes during a home renovation. Typically, the average cost of such changes falls between ₹80 to ₹100 per change. However, it is important to note that the actual cost varies depending on the specific needs and characteristics of the location. If the wall involves significant civil work or complex modifications, the cost is likely to increase accordingly.
4. Electrical work for 4bhk flat design and villa design
When it comes to electrical wiring in India, the average cost is around ₹250 per square foot. However, this cost can vary depending on a number of factors, including the number of electrical points required and the extent of renovation required, especially in the case of older homes. These factors are important to consider because they can contribute to an increase in the overall cost of electrical wiring over the course of your project.
5. wall and floor treatment
When it comes to wall treatments, there are various options available, including stone cladding, wallpaper installation, painting and panelling. The cost of these treatments fluctuates depending on factors such as the total area to be covered and the prevailing market rates. Keeping in mind the current market standards, here is a brief overview of their estimated costs:
Wall treatment
Cost per sq. ft.
Stone cladding
₹50 to ₹700
Wallpaper
₹2,000 to ₹20,000
Painting
₹12 to ₹80
Panelling
₹500 to ₹1800
In India, floor treatments play an important role in interior design and can make a notable impact on your budget. Tiling is a common choice, and the cost includes not only the initial installation but also ongoing maintenance. The type of flooring material you choose can greatly affect overall expenses. From lavish options like marble to more cost-effective options like stone, you have the flexibility to adjust this aspect according to your budgetary considerations. By carefully evaluating your preferences and exploring different flooring options, you can strike a balance between aesthetics, durability and financial feasibility.
6. Modular vs custom carpentry
With all the selections made and the interior design of your flat or villa nearing completion, it is now time to turn your attention to the carpentry work. An important decision before you will be whether to choose a modular design or opt for customized carpentry. If you choose to have your carpentry customized, it’s important to be prepared for the associated costs. While personalized carpentry can bring a unique touch and meet your specific needs, it often requires an additional financial investment. Balancing your budget and design preferences will be essential when evaluating the best approach for your project.
Modular designs offer a cost-effective solution when it comes to furniture for your interiors. These furniture pieces are manufactured using predetermined units and are assembled on-site, resulting in lower costs than custom designs. However, the quality of the end result also depends on the expertise of the carpenter you choose to hire. While contractors typically charge less than interior designers, their services may come with limitations in terms of material and finish options.
At dpodstudio, we take a different approach. We utilize mechanized, precision manufacturing techniques to create impeccable interiors that meet your exact specifications. With us, you’ll have access to a wide range of finishes and materials, giving you more options to bring your vision to life. By combining affordability with superior craftsmanship and a wide selection of options, we strive to give you the best of both worlds.
7. Finishes and Materials Used in 4BHK Home Design
While considering the cost estimate for 4BHK flat interior design, it is necessary to account for the expenses associated with materials and finishes. This aspect plays a vital role in shaping the overall aesthetic and quality of your carpentry work, which ultimately influences the final look of the interior design of your flat or villa. With so many materials and finishes available on the market, it is important to understand the options and their associated costs. To provide you a starting point, here is a summary of popular materials and finishes for storage cabinets and furniture, along with approximate costs. This will help you make an informed decision and plan your budget accordingly.
Materials
Cost per square ft.
Plywood
₹70 to ₹160
MDF
₹30 to ₹200
Blockboards
₹90 to ₹140
Particle Board
₹30 to ₹70
Finish
Estimated cost per sq. ft.
Laminate
₹60 to ₹200 (or higher)
Veneer
₹150 to ₹350 (or higher)
Membrane
₹120 to ₹500
Acrylic
₹120 to ₹460 (or higher)
While the previously mentioned materials and finishes serve as a foundation for kitchen cabinets and storage units, there are additional options to be explored for kitchen countertops, polishes, and floors, which can further affect your overall budget. These elements contribute to the aesthetics, functionality, and durability of your home. From luxurious countertop materials to premium flooring options, the choices you make in these areas can affect the overall cost of your project. It is important to carefully consider these factors and strike a balance between your design preferences and budgetary constraints in order to create a harmonious and cost-effective living space.
8. Purpose of the 4BHK Interior Design
Every homeowner has his or her own distinct preferences when it comes to the interior design of their flat or villa. While the design should suit your needs and lifestyle, there are some general considerations that many homeowners prioritize. These include making the most of space, creating a functional layout, incorporating adequate storage solutions, ensuring proper lighting and ventilation, choosing appropriate color schemes, and integrating aesthetic elements that reflect personal style. By understanding your specific preferences and working closely with a professional designer, you can bring your vision to life and create a personalized living space that truly enhances your daily living experience.
Space Optimization and Storage: Indians have a penchant for storage, and homeowners often prefer adequate storage solutions in their modern villas or flat designs. Designers need to give careful consideration to incorporating enough storage spaces to accommodate the homeowners’ belongings, thereby ensuring a functional and organized living environment.
Luxury interiors: For some homeowners, creating a luxurious interior is a priority in their design aspirations. This pursuit of opulence often involves the use of high-end materials and premium products, increasing the overall cost of an interior project. By prioritizing luxury, homeowners can enhance the aesthetic appeal and create a truly opulent living space that reflects their refined taste and style.
Residence of family members: The design and layout of the interiors have been intricately crafted to accommodate the specific needs and requirements of the family living in the house. The number of family members plays an important role in determining the space required within the house. For example, a small family may find two bathrooms sufficient, while a large family may require an additional bathroom to ensure convenience and comfort for all. By considering family size and dynamics, interior designers can optimize the functionality and utility of living spaces, while promoting a harmonious and comfortable environment for all occupants.
Pet-friendly: Creating pet-friendly interiors is a great way to ensure the comfort and well-being of our beloved furry companions. Designing with pets in mind involves paying extra attention to certain details and considerations. For example, incorporating durable and pet-friendly materials that are resistant to scratches or stains can help maintain the aesthetics of the space. Designating designated areas for pet beds, feeding stations, and toy storage can add to organization and convenience. Additionally, ensuring proper ventilation, easy-to-clean surfaces, and strategic placement of furniture to accommodate pet movement and activities are important aspects of pet-friendly interior design. By adopting these ideas, we can create a harmonious living environment that meets the needs of both our human and animal family members.
9. Themes or Styles in the 4BHK Home Design
The choice of style for your flat or small villa design can have a significant impact on the overall cost. Different styles have different requirements and complexities, which can affect the budget. For example, choosing a Scandinavian or minimalist style often involves a focus on simple design and functionality, resulting in relatively low costs. On the other hand, a home with a colonial or vintage theme may require more custom carpentry and intricate furniture designs, which can increase the expense. Additionally, maintaining the authenticity of a vintage theme may involve using premium finishes such as membrane finishes, which are more expensive than laminates. Considering these factors can help you make an informed decision about the style of your home while managing your budget effectively.
Room-by-Room Cost Details of 4BHK Home Design
To effectively plan the interior design of a 4BHK flat or a small villa, it is beneficial to consider a basic cost breakup for each room. Although these essentials are important, you can always incorporate additional luxury elements depending on your budget and personal preferences. By understanding the basic needs and customizing them to suit your desired comfort and style, you can create a well-balanced and personalized living space that meets your needs.
1. A simple foyer for 4BHK interior design
While designing the foyer of your 4BHK flat or small villa, it is essential to consider the inclusion of a shoe cabinet. The cost of a shoe cabinet will depend on factors such as the material, the finish, and the labor involved. Additionally, the size of the cabinet will also affect the price. For example, a single-door shoe cabinet can range from around ₹7,000 to ₹30,000 for a custom design. By choosing the right shoe cabinet to suit your budget and design preferences, you can create an organized and functional entryway for your home.
2. Beautiful Living Room and 4BHK Flat Interior Design for Villa
When it comes to designing the living room of your 4BHK flat or small villa, there are several essential elements to consider. These include a comfortable sofa, a functional coffee table, and a stylish TV unit. Many homeowners also opt for wall treatments to enhance the overall aesthetics of the space. On average, the cost of a living room design can vary greatly, from around ₹3,00,000 to ₹10,00,000. Of course, you can customize the design and include additional elements based on your budget and personal preferences. By carefully selecting the right furniture, accessories, and decor, you can create a beautiful and inviting living room that reflects your unique style.
3. Simple or luxurious dining space in 4BHK home design
When it comes to designing the dining area of your 4BHK flat or small villa, the possibilities are endless. This can range from a simple dining table setup to a fully decorated space with wall furnishings, treatments, and special lighting. Dining area budgets can vary greatly and cannot be accurately estimated without discussing your specific needs and design vision with your designer. By collaborating closely with your designer and sharing your preferences, you can create a dining area that’s a perfect fit for your style, needs, and budget.
4. kitchen cost estimate of 4bhk house design
When it comes to the cost of designing a kitchen for your 4BHK flat or small villa, there are several factors to consider. The choice of countertop material, finish, cabinet material, and backsplash can significantly affect the overall cost. Additionally, the size of the kitchen and your personal preferences play a role in determining expenses. It is advised to discuss your specific requirements and design preferences with your designer to get a more accurate estimate of kitchen cost that suits your project.
5. A luxury master bedroom for your village or 4bhk flat design
Personalization and comfort are key considerations when it comes to designing the master bedroom in your 4BHK flat or small villa. With essential elements such as a bed and wardrobe, the cost of a master bedroom can vary based on personal preferences. Beds can be customized or bought from shops, with prices varying accordingly. Wardrobe in India typically ranges between ₹20,000 to ₹80,000 depending on factors such as size, design, and material. It is advised to explore the various options and consult your designer to find the best option that suits your budget and desired aesthetics.
6. Unique kid’s room
Designing the kid’s room in your 4BHK flat or small villa involves considering their growing needs and preferences. It’s important to create a space that allows for play and flexibility. Many homeowners choose vibrant and eye-catching colors to encourage creativity. Along with essential elements such as wardrobe storage, a study unit, and a bed, the cost of a kid’s room design can vary depending on factors such as the quality of materials, customization, and additional decor items. Striking a balance between functionality, safety, and budget is recommended to create a joyful space that will grow with your child.
7. A minimalist guest bedroom
Guest bedrooms in Indian homes often prioritize simplicity and versatility to accommodate visitors of different age groups. It is common for these places to adopt a minimalist approach. Essential elements such as comfortable beds and functional wardrobes are usually chosen to ensure ease of use and accessibility.
While the total cost of a guest bedroom design can vary depending on factors such as the quality of the materials and any additional features or amenities, it is important to strike a balance between functionality and cost-effectiveness in order to create a welcoming and comfortable space for your guests. It is recommended.
8. A Balcony
The design of the balcony may vary depending on its size and intended purpose. For those looking for a quiet place to enjoy some respite, a small and comfortable seating arrangement will suffice. However, if you envision using the balcony to host dinner parties or set up a bar, additional interior work may be necessary to turn it into a functional and attractive space. Balcony design costs can fluctuate depending on the extent of modification and material choice, so it’s important to discuss your specific needs with your designer to ensure a tailored and budget-friendly solution.
9. Pooja room cost estimate
Incorporating a puja room into your 4BHK house plan can be budget-friendly. Pooja rooms in India can generally be built within a reasonable cost range, starting from less than a lakh. Depending on your preferences, you have the flexibility to design a minimalist puja room or add intricate latticework to enhance its aesthetic appeal. With careful planning and consultation with your designer, you can create a calming and spiritual space that suits your budgetary constraints.
The cost difference between a new home and a renovation
When discussing new home costs, it’s important to consider the potential variations when it comes to renovation projects. Resale value plays an important role in determining whether investing in interiors will increase the value of your property. If the answer is negative and the interior refurbishing will not significantly increase the resale value, then undertaking an extensive interior renovation may not be a viable option. Evaluating the potential return on investment and consulting real estate experts can help you make an informed decision about the feasibility of the interior renovation of your home.
Renovating an existing home can be challenging, especially if you already live in it. Civil work cost can also be an important factor to consider. However, if your home is worth the effort, opting for renovation can provide a cost-effective way of enjoying a fresh flat or villa design. With the ability to customize the design, this can be a more cost-effective option than buying a new property.
We hope this guide has provided you with the required information to estimate the cost of your 4BHK. If you are interested in finding out the budget for 3BHK, we at dpod studio have compiled specific interior design cost information for 3BHK apartments. To gain further confidence in our services, you can browse our portfolio of previous interior projects showcasing our expertise and creativity. If you have any inquiries or need assistance with your interior requirements, please do not hesitate to contact us. We look forward to cooperating with you!
In conclusion, as you embark on your journey to create a beautiful as well as functional living space, we hope that the information provided by dpod studio, a reputed interior design company in Ahmedabad, helps you in understanding the various factors involved in a design and Has been helpful in understanding the costs. 4BHK Flat or Small Villa. From assessing the location and size of the property to considering structural changes, electrical wiring, wall treatments, and furniture options, every aspect plays an important role in shaping your dream home.
At dpod studio, we understand the importance of personalized and thoughtful designs that suit your preferences and lifestyle. Our team of experienced designers is dedicated to bringing your vision to life while considering your budgetary constraints. We take pride in offering tailored solutions, whether you prefer modular furniture or customized carpentry work, ensuring that every detail is carefully planned and executed.
With a focus on providing exceptional client satisfaction, dpod studio invites you to explore our portfolio of past interior projects showcasing our expertise and creativity. We value our customers’ feedback and encourage you to share their experiences, as we believe their testimonials speak volumes about the quality and professionalism of our services.
dpod studio is here to guide you every step of the way as you embark on your interior design journey. Our team is committed to providing innovative and functional designs that transform your living space into a true reflection of your personality and style. Contact us today to discuss your interior design needs and let us create a space that exceeds your expectations.
Looking to remove laminate from plywood? This comprehensive step-by-step guide offers invaluable insights, tips, and tricks to help you navigate the process effortlessly. Unlock the secrets to a successful removal and restore your plywood’s natural beauty.
Introduction to laminate and its uses on plywood
Table of Contents
Laminate is a versatile material widely used to enhance the appearance and durability of plywood. It is a composite material made by layering multiple thin sheets of paper or fabric, impregnated with resins, and then bonded together under high pressure and heat. The resulting laminate is incredibly durable, resistant to scratches, moisture, and impact. It is commonly used in various applications on plywood, such as kitchen cabinets, countertops, furniture, and flooring. Laminate comes in a wide range of colors, patterns, and textures, allowing for endless design possibilities. Its affordability, ease of installation, and low maintenance requirements make it a popular choice for both residential and commercial projects.
What is laminate?
Laminate is a synthetic material composed of layers of paper or fabric impregnated with resins and fused together under high heat and pressure. The top layer is typically a clear protective layer that provides durability and resistance to scratches, stains, and moisture. Beneath the top layer, there is a decorative layer that can mimic the appearance of various materials, such as wood, stone, or metal. The core layer is made of compressed fiberboard or particleboard, which provides stability and strength. Laminate is commonly used as a surfacing material for countertops, cabinets, furniture, flooring, and wall panels due to its affordability, versatility, and durability.
Why is laminate used on plywood?
Laminate is a dynamic addition to plywood, serving multiple purposes and providing unique advantages. Its utilization of plywood surfaces encompasses both functional and aesthetic benefits. Primarily, laminate acts as a safeguard, shielding plywood from scratches, moisture, and impact, thereby prolonging its lifespan. This proves particularly valuable in high-traffic areas like kitchens or countertops. Moreover, laminate offers an array of distinctive designs, ranging from authentic wood grains to captivating stone patterns, enabling creative expression and customization. Its cost-effective nature renders the replication of natural materials viable, making it an appealing option for budget-conscious projects. Furthermore, the low maintenance and effortless cleaning requirements of laminate ensure convenience and long-lasting beauty in residential and commercial applications alike.
Common applications of laminate on plywood
Laminate applied on plywood finds widespread use in various applications due to its versatility and practicality. Some common applications include:
Kitchen Cabinets: Laminate-coated plywood is a popular choice for kitchen cabinets, providing a durable and moisture-resistant surface that withstands daily use and spills.
Countertops: Laminate is frequently used as a surfacing material for countertops, offering an extensive range of colors and patterns to complement different design styles while providing a resilient and easy-to-clean surface.
Furniture: Plywood furniture pieces, such as tables, shelves, and bookcases, often incorporate laminate for added durability and aesthetic appeal. It allows for diverse design options, including sleek modern finishes or wood grain textures.
Flooring: Laminate flooring on plywood is a cost-effective alternative to hardwood flooring. It replicates the appearance of wood or stone and provides a durable, scratch-resistant surface that is easy to maintain.
Wall Panels: Laminate-covered plywood panels are utilized for wall cladding in both residential and commercial settings. They offer a decorative element while providing protection and easy upkeep.
Retail Fixtures: Laminate-coated plywood is commonly used in retail environments for display fixtures, shelving units, and cash wraps, thanks to its durability and ability to withstand heavy use.
Exhibition Displays: Plywood laminated with vibrant and eye-catching finishes is often employed in exhibition booths and displays, allowing for customization and branding opportunities.
The versatility of laminate on plywood enables its usage in various contexts, offering durability, aesthetic appeal, and cost-effectiveness across different applications.
Understanding the reasons for laminate removal
Signs that indicate laminate removal is necessary
There are several signs that indicate the need for laminate removal:
Damage: If the laminate is severely damaged, such as deep scratches, chipping, or peeling, it may be necessary to remove it. Damaged laminate not only affects the aesthetics but can also compromise the integrity of the underlying plywood.
Wear and Tear: Over time, laminate can show signs of wear and tear, such as fading, discoloration, or loss of gloss. If the appearance of the laminate has significantly deteriorated, removing and replacing it can restore the desired look.
Moisture or Water Damage: If moisture or water has penetrated the laminate and caused warping, swelling, or mold growth on the plywood, it is crucial to remove the laminate to address the underlying moisture issue and prevent further damage.
Loose or Lifted Edges: Laminate that has edges lifting or coming loose indicates poor adhesion. This can lead to further delamination and compromise the integrity of the surface. Removing and reapplying the laminate ensures a secure and seamless finish.
Outdated or Mismatched Style: If the laminate design or color is outdated or no longer matches the desired aesthetic, removal becomes necessary to update the space and achieve a cohesive look.
Structural Changes: During renovation or remodeling projects, when structural changes are being made to the underlying plywood, laminate removal may be necessary to accommodate the alterations and ensure a proper fit.
It’s important to assess the extent of the issues and consult with professionals to determine if laminate removal is the appropriate course of action in each specific situation.
Reasons for removing laminate from plywood
There are several reasons why one might need to remove laminate from plywood:
Damage: If the laminate has been damaged, such as by deep scratches, cracks, or burns, it may be necessary to remove it. Damaged laminate can detract from the appearance and functionality of the surface.
Wear and Tear: Over time, laminate can show signs of wear and tear, including fading, discoloration, or loss of its protective finish. Removing the old laminate allows for the installation of new, fresh laminate to restore the surface’s original look.
Upgrading or Changing Style: When the existing laminate no longer aligns with the desired aesthetic or if you wish to update the style of the surface, removing the current laminate is necessary before installing a new laminate that better suits your preferences.
Adhesion Issues: If the laminate is coming loose or has poor adhesion to the plywood, it can lead to further delamination or create an uneven surface. Removing the laminate allows for proper repairs and the reapplication of a new layer.
Structural Modifications: During remodeling or renovations, structural changes may require the removal of existing laminate. This allows for adjustments to the plywood, such as cutting or resizing, to accommodate the modifications before reinstalling the laminate or choosing a different surface treatment.
Water or Moisture Damage: If water or moisture has penetrated the laminate and caused swelling, warping, or mold growth on the plywood, it is crucial to remove the laminate to address the underlying moisture issue and prevent further damage to the substrate.
Removing laminate from plywood requires careful consideration and proper techniques to avoid damaging the plywood surface. Consulting with professionals or researching appropriate removal methods is recommended to ensure a successful process.
Benefits of removing laminate
Removing laminate from plywood can offer several benefits, including:
Restoration of the Plywood Surface: Removing the laminate allows you to restore the original appearance and condition of the plywood. It gives you a clean slate to work with, enabling you to address any underlying issues or damage that may have been hidden beneath the laminate.
Flexibility in Surface Treatment: Once the laminate is removed, you have the freedom to choose a different surface treatment for the plywood. This opens up a range of possibilities, such as staining, painting, or applying a new type of laminate or veneer that better suits your desired aesthetic or functional requirements.
Repair and Maintenance: Removing the laminate provides an opportunity to inspect the plywood for any damage, such as water or moisture issues, rot, or structural problems. You can address these issues before applying a new surface treatment, ensuring the long-term durability and integrity of the plywood.
Customization: Removing the existing laminate allows you to personalize the plywood surface according to your specific preferences and design goals. Whether you want to create a unique finish, showcase the natural beauty of the wood, or experiment with different textures and patterns, removing the laminate gives you the flexibility to customize the surface to your liking.
Cost Savings: In some cases, removing the laminate can be a cost-effective option compared to replacing the entire plywood panel. Instead of investing in entirely new materials, you can work with the existing plywood by removing the old laminate and applying a new surface treatment, achieving a refreshed look without significant expenses.
It’s important to consider the condition of the plywood and consult with professionals or research appropriate removal methods to ensure a successful and safe process.
Tools and materials needed for laminate removal
Essential tools for the removal process
When it comes to removing laminate from plywood, several essential tools can make the process more efficient and effective. Here are some tools commonly used:
Heat Gun or Hair Dryer: Applying heat helps loosen the adhesive bonding the laminate to the plywood. A heat gun or hair dryer can be used to gently warm the laminate surface, making it easier to peel off.
Putty Knife or Scraper: A putty knife or scraper is essential for carefully lifting and scraping off the laminate from the plywood. It helps in separating the laminate from the adhesive layer and allows for controlled removal.
Utility Knife or Razor Blade: A utility knife or razor blade is useful for cutting through the edges and seams of the laminate. It helps in creating initial access points for easier removal and can also be used to trim the laminate as needed.
Pry Bar or Crowbar: A pry bar or crowbar can assist in removing larger sections of laminate that may be firmly adhered to the plywood. It provides leverage to pry up the laminate and separate it from the surface.
Adhesive Remover: Depending on the type of adhesive used, an adhesive remover may be necessary to dissolve and remove any residual adhesive from the plywood after the laminate is peeled off. Follow the instructions provided with the adhesive remover for safe and effective use.
Safety Equipment: It is important to prioritize safety during the removal process. Wear safety goggles, gloves, and a dust mask to protect yourself from any potential debris, dust, or chemical residue.
Remember to exercise caution while using these tools and to work slowly and carefully to avoid damaging the plywood surface. If unsure about the removal process, consulting with professionals or seeking guidance from experienced individuals can be beneficial.
Safety equipment required
During the removal of laminate from plywood, it’s crucial to prioritize safety and protect yourself from potential hazards. The following safety equipment is recommended:
Safety Goggles: Safety goggles protect your eyes from flying debris, wood chips, or adhesive particles that may be released during the removal process. They shield your eyes and help prevent injuries.
Gloves: Wear sturdy work gloves to safeguard your hands from cuts, scrapes, or any sharp edges while handling tools or removing the laminate. They provide grip and protect your skin from potential hazards.
Dust Mask or Respirator: When working with laminate removal, dust, and particles can become airborne. Wearing a dust mask or respirator helps filter out harmful particles, reducing the risk of inhaling dust, adhesive residue, or other contaminants.
Protective Clothing: It’s advisable to wear long-sleeved shirts and long pants to protect your skin from scratches, cuts, or potential exposure to chemicals. Avoid loose clothing that can get caught in tools or machinery.
Knee Pads: If you’re working on your knees during the removal process, consider using knee pads to provide cushioning and protect your knees from strain or injury.
Hearing Protection: If you’re using power tools, such as a heat gun or electric saw, the noise level can be loud and potentially damaging to your hearing.
It’s important to use the appropriate safety equipment based on the specific tools and processes involved in the laminate removal. Always follow the manufacturer’s instructions for the tools and equipment used and prioritize safety throughout the entire process.
Additional materials that can facilitate the process
In addition to the essential tools, several additional materials can facilitate the process of removing laminate from plywood. These materials can make the removal process more efficient and help protect the surrounding areas:
Drop Cloths or Plastic Sheets: Lay down drop cloths or plastic sheets to protect the floor or surrounding surfaces from debris, adhesive residue, or any accidental damage during the removal process. This makes cleanup easier and prevents damage to other surfaces.
Adhesive Solvent or Remover: Depending on the type of adhesive used to attach the laminate, an adhesive solvent or remover may be necessary. Apply the solvent to the adhesive residue left on the plywood after removing the laminate. Follow the manufacturer’s instructions for safe and effective use.
Plastic or Metal Scrapers: Plastic or metal scrapers can be used in conjunction with the adhesive solvent to help remove any remaining adhesive residue from the plywood. They allow for controlled scraping without damaging the plywood surface.
Sandpaper or Sanding Block: After removing the laminate and adhesive residue, sandpaper or a sanding block can be used to smoothen the plywood surface and remove any remaining traces of adhesive or imperfections. Choose an appropriate grit for the desired finish.
Cleaning Supplies: Have cleaning supplies ready to clean the plywood surface after the laminate removal process. This can include a bucket, mild soap or cleaning solution, sponges or rags, and water for wiping down and preparing the plywood for any further treatment or refinishing.
These additional materials help ensure a smooth and efficient removal process while minimizing potential damage and simplifying the cleanup afterward. Always follow safety guidelines and manufacturer instructions when using any materials or products.
Step-by-step guide to removing laminate from plywood
Preparing the workspace and ensuring safety
Preparing the workspace and ensuring safety is an important aspect of any project, including the removal of laminate from plywood. Here are the steps to prepare the workspace and maintain a safe environment:
Clear the area: Remove any furniture, objects, or obstacles from the workspace to create a clear and spacious area for the laminate removal process. This prevents accidents and allows for easier movement during the project.
Ventilation: Ensure the workspace is well-ventilated by opening windows or using fans. Proper ventilation helps dissipate any fumes or odors that may arise from the adhesive or cleaning products used during the removal process.
Protect surrounding surfaces: Cover the floor, furniture, or any nearby surfaces with drop cloths, plastic sheets, or protective materials. This protects them from debris, adhesive splatters, or accidental damage during the removal process.
Secure the workpiece: If possible, secure the plywood securely to a workbench or a stable surface. This ensures stability and minimizes the risk of movement or accidents while working.
Wear appropriate safety gear: Put on the necessary safety gear, including safety goggles to protect your eyes from debris, gloves to shield your hands, a dust mask or respirator to filter out airborne particles, and any other protective equipment recommended for the specific task.
Organize tools and materials: Have all the required tools and materials within reach and well-organized. This saves time and reduces the risk of accidents caused by searching for tools or tripping over clutter.
Follow safety guidelines: Familiarize yourself with the safety guidelines provided by the tool manufacturers and adhere to them throughout the project. Pay attention to handling hot tools, sharp objects, and potentially hazardous materials.
Work in a well-lit environment: Ensure proper lighting in the workspace to have clear visibility of the area and minimize the risk of accidents due to poor visibility.
Have a first aid kit: Keep a first aid kit readily available in case of any minor injuries that may occur during the removal process.
By following these steps and prioritizing safety, you can create a workspace that promotes a safe and efficient laminate removal process. Remember to exercise caution, work at a comfortable pace, and seek professional assistance if needed.
Assessing the condition of the laminate and plywood.
Before starting any project involving laminate and plywood, it is important to assess their condition to ensure the best results. Proper evaluation helps determine whether materials are fit for use or if they need to be repaired or replaced. Here are some steps for assessing the condition of laminate and plywood:
Inspect for damage: Examine the laminate and plywood carefully for any visible signs of damage such as cracks, chips, or warping. These issues can affect the overall integrity and appearance of the material.
Check for water damage: Moisture can cause laminate and plywood to swell or mold and rot. Watch for any signs of water damage, such as discoloration, soft spots, or a musty smell. It is important to address water damage before moving forward with any project.
Evaluate Adhesion: Examine the bond between the laminate and the plywood. If you see any peeling, bubbling, or loose edges, this indicates poor adhesion. This can affect the durability and life of the material.
Consider wear: Assess wear on the laminate surface. Scratches, stains, or fading may require refinishing or replacement depending on the severity.
By thoroughly assessing the condition of the laminate and plywood, you can make an informed decision about their usefulness and whether any repairs or replacements are necessary.
Techniques for removing laminate
When it comes to removing laminate, there are several techniques you can use depending on the type of laminate and the surface it is glued to. Here are some of the commonly used techniques for removing laminate:
Heat and Peel Method: This method involves using heat to soften the adhesive and then peeling off the laminate. You can use a heat gun or a clothes iron on a low heat setting to apply heat to the surface of the laminate. Once the adhesive has softened, use a putty knife or scraper to carefully lift and peel away the laminate.
Score and Peel Method: For thicker laminates or laminates that are difficult to remove, scoring the surface can help. Use a utility knife or laminate scoring tool to make shallow cuts or scores on the laminate surface. This will allow the adhesive to release more easily when you begin to peel it away.
Solvent or adhesive remover methods: If the adhesive used to join the laminate is particularly stubborn, you can try using a solvent or adhesive remover. Apply solvent or adhesive remover to the edges or bottom of the laminate and let it sit for a while to soften the adhesive. Then, use a putty knife or scraper to lift and remove the laminate.
Steam Method: Steam can also be effective in loosening the adhesive and making the removal process easier. You can use a handheld steamer or steam iron to direct the steam onto the surface of the laminate. After steaming, gently peel off the laminate using a putty knife or scraper.
Remember to work slowly and carefully when removing the laminate so as not to damage the underlying surface. Always wear protective gloves and goggles, and consider using a mask or working in a well-ventilated area, especially if using solvents or adhesive removers.
Heat-based methods (using a heat gun or iron)
Heat Gun Method:
Set the heat gun to the medium heat setting and plug it in.
Holding the heat gun a few inches from the surface of the laminate, move it in a circular motion to evenly distribute the heat.
Heat a small section of the laminate for about 30 seconds or until the adhesive softens.
Use a putty knife or scraper to lift the edge of the hot laminate.
Slowly peel back the laminate, applying heat as needed.
Repeat this process in small sections until all of the laminate is removed.
Iron Method
Set the iron to a low or medium heat setting without steam.
To protect the laminate, place a cloth or aluminum foil over it.
Press the hot iron onto the fabric/foil, moving it in a circular motion for about 30 seconds to heat the laminate and soften the adhesive.
Use a putty knife or scraper to lift one edge of the laminate.
Slowly put the laminate back in, taking the heat as needed.
Repeat this process in small sections until all of the laminate is removed.
Solvent-based Methods for Removing Laminate:
Adhesive Remover Method:
Apply adhesive remover or solvent to the edges or underside of the laminate.
Use a putty knife or scraper to gently lift and peel away the laminate.
Apply more adhesive remover as needed and continue peeling until all of the laminate is removed.
Wipe the surface with a clean cloth to remove any residue.
Mechanical Methods for Removing Laminate:
Chisel Method:
Use a chisel to carefully separate the laminate from the surface underneath.
Insert the chisel between the laminate and the substrate and gently tap it with a hammer.
Slowly work your way along the edges, lifting and separating the laminate from the surface.
Once the laminate is loosened, continue peeling it off by hand or using a scraper.
Saw Method:
Make shallow cuts or grooves in the surface of the laminate using a saw (eg, circular saw, jigsaw).
Use a chisel or putty knife to remove the sections of laminate between the cuts.
Remember to take proper safety precautions when working with solvents or mechanical equipment, such as wearing protective gloves, goggles, and a mask. Work methodically and carefully to avoid any damage to the surface or yourself during the removal process.
Tips for minimizing damage to the plywood surface.
When removing laminate from plywood, it is important to minimize damage to the plywood surface in order to maintain its integrity and ensure a smooth transition to the next phase of your project. Here are some tips to help you minimize the damage:
Use gentle and controlled force. Apply moderate pressure when lifting the laminate or removing the adhesive. Avoid using excessive force, as this may cause gouges or indentations in the plywood.
Start at the edges. Begin removing the laminate from the edges, rather than the center. This approach allows you to work slowly and minimizes the risk of accidentally damaging the plywood surface.
Work in smaller sections: Break the laminate into manageable sections and focus on removing one section at a time. This approach helps maintain control and prevents the plywood from becoming overly exposed or weak.
Work in smaller sections: Break the laminate into manageable sections and focus on removing one section at a time. This approach helps maintain control and prevents the plywood from becoming overly exposed or weak.
Apply heat or solvent sparingly: Heat and solvent can soften the adhesive and make the removal process easier. However, excessive heat or the use of a solvent can damage the surface of the plywood. Use these methods sparingly and with caution, following the manufacturer’s directions or recommendations.
Use sharp and appropriate tools: Make sure your tools, such as a putty knife or scraper, are sharp and fit for the job. Dull or improper tools can cause more damage or leave residue on the surface of the plywood.
Take breaks when needed. If you encounter resistance or are finding it difficult to remove the laminate without damaging it, take a break to reevaluate your approach. Rushing the process can lead to unintended consequences.
Clean the surface afterward: Once the laminate is removed, clean the plywood surface using a mild cleaner and water. This step removes any remaining adhesive residue and prepares the surface for further treatment or refinishing.
Remember, patience and caution are key to minimizing losses. Take your time, work methodically, and make plywood surface protection a priority during the laminate removal process.
Dealing with stubborn or difficult laminate:
Dealing with stubborn or tough laminates can present challenges during the removal process. Here are some strategies, troubleshooting tips, and alternative approaches to help you overcome these difficulties:
Strategies for handling strongly adhered laminate:
Increase heat application: Apply more heat, using a heat gun or iron, to soften the adhesive. The heat helps loosen the bond between the laminate and plywood, making it easier to remove.
Use a putty knife or scraper. Work the edge of a putty knife or scraper under the laminate and gently pry it up. Applying controlled force and leverage with a tool can help loosen the laminate.
Tap lightly with a mallet. If the laminate is particularly stubborn, tap a putty knife or scraper with a rubber mallet without damaging the plywood surface.
Troubleshooting common challenges during the removal process:
Leftover Residue: If adhesive residue remains on the plywood after removing the laminate, apply an adhesive remover or solvent to dissolve the residue. Follow the manufacturer’s directions and use a putty knife or scraper to gently scrape it away.
Damaged plywood surface: If the plywood is damaged during the removal process, assess the severity of the damage. Minor scratches or dents can often be fixed with wood filler or sanding. For extensive damage, consider replacing the affected sections of plywood.
Alternative approaches for removing stubborn laminate:
Mechanical methods: If the adhesive proves exceptionally resistant, consider using mechanical methods. This may involve using a power sander with coarse-grit sandpaper to sand off the layer of laminate and adhesive. Be careful, however, not to sand too deeply into the plywood.
Professional Help: For extremely stubborn or challenging cases, seeking professional help from a contractor or specialist in laminate removal may be a viable option. They have the experience, specialized equipment, and techniques to handle difficult situations effectively.
Cleaning and preparing the plywood after laminate removal:
Cleaning and preparing the plywood after laminate removal is essential to ensuring a smooth and pristine surface for your next project. Here are the steps to follow, including the removal of residual adhesive or glue, sanding, and precautions to prevent damage:
Removing residual adhesive or glue:
Apply an adhesive remover or solvent specifically designed for the type of adhesive used. Follow the manufacturer’s directions for application and take your time.
Use a putty knife or scraper to gently scrape away the softened adhesive. Work carefully to avoid scratching or scuffing the surface of the plywood.
Wipe away the removed adhesive using a cloth or sponge dampened with water or a mild cleaner. Make sure all residues are thoroughly removed.
Sanding and smoothing the plywood surface:
Inspect the plywood surface for any remaining rough patches, adhesive residue, or imperfections.
Use sandpaper or a power sander with medium to fine grit (eg, 120 to 220) to sand the surface of the plywood. Sand in the direction of the grain of the wood to avoid creating scratches.
Focus on smoothing out any irregularities or rough areas. Start with a coarser grit sandpaper and gradually switch to a finer grit for a smoother finish.
After sanding, wipe the surface of the plywood with a clean cloth or vacuum it to remove any dust or debris.
Precautions to prevent damage to the plywood during cleaning:
Avoid using excessive moisture during cleaning to avoid water damage or warping of the plywood. Use a damp cloth or sponge instead of soaking the plywood surface.
Be careful when scraping off the adhesive or sanding to avoid accidentally scratching or scuffing the plywood.
Use a light touch and let the tools and sandpaper do the work. Apply even pressure and avoid applying excessive force.
By following these steps and taking the necessary precautions, you can effectively clean and prepare the plywood surface after removing the laminate. This will provide a clean canvas for your next project and help ensure a professional and polished result.
Repairing or refinishing the plywood:
Repairing or refinishing plywood after removing the laminate can enhance its appearance and durability. Here are the steps for assessing the condition of the plywood, filling gaps or holes, and applying a new finish or protective coating:
Assessing the condition of the plywood:
Inspect the plywood for any visible damage, such as scratches, dents, or gouges. Assess the overall quality and stability of the plywood.
Determine whether any repairs or additional preparations are needed based on the extent of the damage.
Filling gaps or holes in the plywood surface:
If there are small gaps or holes in the plywood, use wood filler or putty that matches the color of the plywood.
Apply wood filler with a putty knife, filling gaps or holes evenly. Smooth the surface using a putty knife or the edge of a sanding block.
Allow the wood filler to dry completely according to the manufacturer’s directions.
Lightly sand the filled areas to ensure a flush and smooth surface with the surrounding plywood.
Applying a new finish or protective coating:
Select an appropriate finish or protective coating depending on your desired look and the plywood’s intended use (e.g., paint, stain, varnish, or polyurethane).
Before applying the finish, make sure the plywood surface is clean and free of any dust or debris.
Follow the manufacturer’s instructions for the chosen finish or protective coating, including proper application techniques and drying times.
Apply thin, even coats, allowing each coat to dry completely before applying the next one.
Sand lightly between coats if necessary, using a finer-grit sandpaper, to achieve a smooth and even finish.
Once the final coat is applied and completely dry, inspect the plywood for any touch-ups or additional finishing touches.
By assessing the plywood’s condition, addressing any gaps or holes, and applying a new finish or protective coating, you can restore the plywood’s appearance and protect it for long-term use. Always follow the product instructions and work in a well-ventilated area when applying finishes or protective coatings.
In conclusion, this comprehensive guide has provided valuable insight into various aspects of interior design, highlighting the expertise and services provided by DPOD Studio, a respected interior design company based in Ahmedabad. Throughout the article, we have discussed key points related to interior design, stressing the importance of professional guidance and expertise while transforming spaces.
We covered a range of topics including space planning, color schemes, furniture selection, lighting, and accessories. By following these principles, DPOD Studio ensures that each project is thoughtfully designed to reflect a client’s unique style and preferences while optimizing functionality and aesthetics.
We encourage our readers to share their experiences or ask any other questions they may have. At DPOD Studio, we value open communication and believe in building strong relationships with our clients. We are here to address any queries or concerns you may have and guide you throughout your interior design journey.
To further explore the world of interior design, we recommend viewing our website and portfolio, which showcase our past projects and demonstrate our commitment to excellence. In addition, there are many online resources, design magazines, and books available that can provide valuable insight and inspiration into the world of interior design.
dpod Studio takes pride in providing exceptional interior design solutions that transform spaces into stunning, functional, and personalized environments. With our expertise and attention to detail, we aim to exceed our client’s expectations and create spaces that truly reflect their vision and style.
So whether you are looking to revamp your home, office, or any other space, consider DPOD Studio as your trusted partner in interior design. Contact us today to discuss your project and let our team of talented designers bring your vision to life. Together, we can create places that inspire and leave a lasting impression.
Unveiling the Artistry: 10 Exquisite Two – colour Combinations for Kitchen Laminates in Your Modern Home
When it comes to preserving the beauty and durability of your kitchen furniture units, kitchen laminates stand as unsung heroes. More than mere protectors, they express your interior décor theme, seamlessly blending style with functionality. Suppose you’re embarking on a kitchen project and crave a touch of uniqueness. In that case, we present a handpicked collection of 10 captivating two-colour combinations for kitchen laminates, designed exclusively for modern homes.
Our curated selection of two-colour combinations exudes charm and sophistication, ensuring your kitchen becomes a testament to impeccable taste. From bold contrasts to harmonious hues, each combination has been carefully crafted to inspire creativity and elevate your kitchen’s aesthetic allure.
But before you take the plunge into this world of design possibilities, equip yourself with essential tips that will empower you to make informed decisions. Armed with knowledge, you’ll navigate the realm of kitchen laminates with confidence and finesse, transforming your culinary space into a haven of individuality and style.
Table of Contents
Prepare to witness your kitchen transform into a breathtaking work of art. With our meticulously chosen two-colour combinations, you’ll embark on a design adventure that transcends the ordinary and unlocks the extraordinary. Let your kitchen become a testament to your distinctive taste and immerse yourself in the boundless potential of kitchen laminates in your modern home.
A Symphony of Flavor and Design: Unveiling Mesmerizing Two-Colour Combinations for Kitchen Laminates
The kitchen, a sacred space where culinary journeys begin and memories are forged, holds the power to delight our senses and nourish our souls. As discerning creators, we understand that crafting a kitchen goes beyond mere functionality; it’s an art form that intertwines beauty and practicality in perfect harmony.
In our quest to ignite your creativity and infuse your kitchen with an atmosphere that inspires, we present an exclusive collection of two-colour combinations for kitchen laminates. Prepare to be captivated by the symphony of hues meticulously curated to create a stimulating ambiance that mirrors your unique culinary style.
Embrace the fusion of colors, where each combination is a brushstroke on the canvas of your kitchen. From tantalizing contrasts to harmonious palettes, these two-colour combinations breathe life into your space, ensuring a culinary experience that is as visually enchanting as it is delectable.
Let this treasure trove of inspiration guide you on a transformative journey, where your kitchen becomes an immersive work of art. These captivating two-colour combinations for kitchen laminates will elevate your culinary haven to new heights, ensuring every day in the heart of your home is an extraordinary symphony of flavor and design.
2026 colour combinations for kitchen laminates
1. Green and gold
The Emerald Oasis: Elevating Your Kitchen’s Aura with a Lush Green Palette and Golden Accents
Step into an oasis of tranquility where the captivating allure of sober green, reminiscent of lush emerald hues, intertwines harmoniously with the radiance of golden accents, breathing life into your kitchen. Immerse yourself in the art of color selection, ensuring the tiles you choose to possess the lightest tones, creating a mesmerizing interplay of shades.
As you infuse your kitchen with the soothing essence of green, allow its verdant charm to transport you to a serene sanctuary. Like leaves dancing in the wind, this palette will envelop your space, evoking a sense of nature’s embrace and tranquility.
To enhance the enchantment, adorn your kitchen with golden accents, reminiscent of rays of sunlight cascading through a lush canopy. These gleaming embellishments will infuse your space with a touch of opulence, adding an element of allure and sophistication.
In your quest for the perfect tiles, seek those with the lightest tones, for they hold the secret to unlocking the true magic of this palette. These ethereal hues will bathe your kitchen in a soft, luminous glow, creating an atmosphere of openness and serenity.
Let the synergy of colour, texture, and elegance transform your kitchen into a haven of refined taste and serenity. With the lush green palette and golden accents as your guide, witness your culinary haven evolve into an emerald oasis, where every moment is a celebration of beauty and harmony.
2. Yellow and white
Celestial Harmony: Embrace the Luminosity of the Sunshine Design with Light Yellow and Purest White
Step into a realm of exquisite beauty known as the sunshine design, where the refreshing allure of light yellow intertwines with the purity of the purest white, creating a celestial masterpiece that transcends ordinary aesthetics. Prepare to immerse yourself in a unique ambiance that emanates radiance and inspires serenity.
Allow the rejuvenating aura of light yellow to awaken your senses, infusing your space with a burst of energy and vibrant cheer. Like the gentle touch of sunshine, this hue envelops your kitchen, invoking feelings of warmth, happiness, and boundless creativity.
In perfect harmony, the purest white complements the light yellow, elevating the celestial beauty of this colour combination to new heights. Its pristine elegance creates a sense of purity and serenity, transforming your kitchen into a sanctuary of tranquility and refined sophistication.
This enchanting pairing, reminiscent of sunlit skies and the crisp purity of untouched landscapes, brings a touch of celestial magic to your surroundings. It whispers of dreams fulfilled and endless possibilities, inviting you to bask in its ethereal glow and embrace the extraordinary in the everyday.
Experience the transcendent beauty of the sunshine design as it illuminates every corner of your kitchen, infusing it with a luminous charm that captivates the heart and uplifts the spirit. Let the harmonious blend of light yellow and purest white transport you to a realm of celestial harmony, where culinary creations become an art form and every moment becomes a celebration of life’s radiant beauty.
3. Warm grey and white
Unleash Unmatched Modernity: Light Grey and White Fuse in a Captivating Color Symphony
Prepare to witness an extraordinary fusion that effortlessly outshines the vibrant pop colors of contemporary trends. The mesmerizing combination of light grey and white creates a visual spectacle that exudes unparalleled sophistication, setting a new standard for modern aesthetics.
Step into a realm where elegance and modernity converge, as the subtle allure of light grey takes the spotlight. Its understated charm adds a touch of refinement to your space, while its versatile nature harmonizes flawlessly with various design styles, showcasing its versatility and timeless appeal.
In perfect synergy, the purity of white emerges, illuminating the color palette with its pristine brilliance. Like a blank canvas, it allows the light grey to take center stage, while infusing the atmosphere with an invigorating sense of purity, serenity, and limitless possibilities.
This extraordinary colour combinations transcends the ordinary, creating a visual masterpiece that captures attention and leaves a lasting impression. Its understated allure speaks volumes, proving that true sophistication lies not in bold and flashy hues, but in the artful harmony of subtle tones.
Prepare to be enraptured as light grey and white intertwine, weaving an unparalleled symphony of modernity and elegance. Together, they redefine the boundaries of contemporary design, beckoning you to embrace their unique charm and unleash a new era of captivating aesthetics.
4. Orange and blue
Unleash Unconventional Modernity: Soft Blue Laminates and Pop Orange Elements for a Kitchen Transformation Like No Other
Get ready to immerse your kitchen in a realm of unparalleled modernity as we explore the captivating world of pop elements. Brace yourself for the harmonious fusion of soft blue laminates and vibrant pop orange elements, an extraordinary combination that will revolutionize your culinary space.
It’s time to break free from the ordinary and infuse your kitchen with a breath of fresh air. The soft blue laminates take the lead, enveloping your space in a tranquil ambiance that exudes calmness and serenity. This soothing hue becomes the foundation upon which a contemporary masterpiece will be built.
But let’s not settle for the expected—let’s introduce the unexpected with bold and vibrant pop-orange elements. Like electrifying sparks of creativity, they inject a burst of energy and playfulness into your kitchen, transforming it into a dynamic haven of culinary inspiration. These eye-catching accents become focal points that ignite conversation and evoke a sense of wonder.
The marriage of soft blue and pop orange transcends the ordinary, creating a symphony of colors that defies conventions and sets new standards of modern aesthetics. This daring combination reflects your unique personality and design sensibilities, making a statement that you embrace boldness and refuse to conform.
As you embark on this transformative journey, let the soft blue laminates and pop orange elements guide you toward an extraordinary kitchen experience. Unleash your creativity, embrace the unconventional, and witness your culinary space evolve into a one-of-a-kind sanctuary that is a testament to your fearless approach to modern design.
5. Sunny yellow and red
Unveiling European Essence: Deep Red Signature Accents and Sunny Yellow Laminate for a Kitchen that Radiates Uniqueness
Prepare to embark on a culinary journey that celebrates European elegance with a twist. Step into the realm of uncommon choices as deep red signature accents intertwine with the captivating charm of sunny yellow laminate, creating a kitchen space that exudes unmatched individuality.
Indulge in the richness of deep red, carefully chosen to become the defining elements of your kitchen. Like strokes of passion and sophistication, these signature accents add depth and character, elevating your space to new heights of refinement. With their captivating presence, they become conversation starters, leaving a lasting impression on all who enter.
But let’s not stop there—introduce the unexpected with the vibrant embrace of sunny yellow laminate. Like a burst of sunshine, this radiant hue envelops your kitchen, infusing it with a joyful and energetic atmosphere. It becomes the canvas upon which culinary creativity thrives, evoking feelings of warmth and cheerfulness that ignite your culinary inspiration.
This unique combination of deep red and sunny yellow transcends the ordinary, offering a harmonious fusion of elegance and liveliness. It stands as a testament to your individuality, showcasing your bold approach to design and your penchant for unconventional choices. In your kitchen, European traditions merge with contemporary flair, resulting in a space that is uniquely yours.
As you immerse yourself in this extraordinary European-inspired design, let the deep red signature accents and sunny yellow laminate ignite your imagination. Embrace the freedom to express your style, experiment with textures and finishes, and create a kitchen that is a true reflection of your distinctive taste—a space that radiates with European essence while celebrating the beauty of individuality.
6. Black and red
Unleash Your Kitchen’s Radiance: Red Laminate, Charcoal Black Cabinets, and a White Countertop Paint a Picture of Uniqueness
Prepare to embark on a culinary adventure that defies expectations and embraces unparalleled uniqueness. Envision a kitchen that becomes a masterpiece of contrasts, where the captivating combination of red laminate, charcoal black cabinets, and a pristine white countertop creates a visual symphony that leaves a lasting impression.
Let your imagination take flight as the red laminate dances across your kitchen, infusing it with a vibrant energy that commands attention. Like a bold stroke of creativity, this fiery hue becomes the focal point that sparks excitement and passion within your culinary domain. It becomes an expression of your bold personality and a testament to your daring design choices.
Now, cast your gaze upon the charcoal black cabinets, standing tall as the backdrop to this vivid scene. Like the night sky adorned with stars, they exude an air of mystery and sophistication, adding depth and allure to your kitchen. These cabinets become the canvas upon which the vibrant red laminate takes center stage, creating a mesmerizing interplay of light and darkness.
As your eyes wander, they land upon the pristine white countertop—a symbol of purity and elegance. Like a blank canvas, it offers a clean and timeless foundation for your culinary creations. It serves as a neutral oasis amidst the striking contrasts, allowing the red laminate and charcoal black cabinets to shine even brighter.
Together, this exceptional trio of red, charcoal black, and white forms a harmonious composition that transcends the ordinary. It celebrates the beauty of individuality, where boldness meets refinement, and passion meets sophistication. Your kitchen becomes an artistic expression that reflects your unique style and captivates all who enter.
Embrace the extraordinary in your culinary sanctuary as you bring this exceptional combination to life. Let the red laminate, charcoal black cabinets, and white countertop tell a story of audacity and elegance—a tale of a kitchen that radiates unmatched beauty and becomes a true reflection of your exceptional taste.
7. Brown and beige
Transcend Ordinary Boundaries: Brown, Beige, and a Splash of Fiery Red Unleash Uniqueness in Your Kitchen Space
Prepare to embark on an extraordinary design journey that defies conventions and invites you to embrace the exceptional. Enter a realm where the combination of brown and beige kitchen laminates for cabinets and countertops becomes a canvas for timeless elegance, while a daring splash of fiery red in the background ignites a sense of uniqueness and daring creativity.
Immerse yourself in the depth and richness of the brown and beige laminates as they intertwine, weaving a tapestry of sophistication and refinement throughout your culinary sanctuary. These warm and earthy tones create a comforting and inviting ambiance, setting the stage for culinary inspiration to flourish. The cabinets and countertops clad in these remarkable laminates become a testament to your exquisite taste and unwavering attention to detail.
But let’s break free from the expected—let’s introduce a daring element that sets your kitchen apart. Imagine a splash of fiery red adorning the backdrop, like a blazing inferno of passion and energy. This audacious choice adds a captivating burst of vibrancy, infusing your space with a sense of adventure and excitement. Against the backdrop of brown and beige, the red becomes a focal point that commands attention and sparks conversation—a bold statement that showcases your fearless approach to design.
The combination of brown and beige laminates, along with the audacious splash of fiery red, transcends the ordinary and invites you to embrace uniqueness and self-expression. It’s a celebration of your individuality, where sophistication meets boldness, and tradition intertwines with daring creativity.
As you venture into this realm of extraordinary design choices, let the brown and beige laminates serve as a foundation for culinary magic to unfold. Allow the splash of fiery red to become an emblem of your passion and ignite your imagination. Together, they create a symphony of colors that transforms your kitchen into an unparalleled space—a true reflection of your distinctive style and unwavering commitment to pushing boundaries.
Embrace the extraordinary and infuse your kitchen with a blend of timeless elegance, daring creativity, and audacious vibrancy. Let the combination of brown, beige, and fiery red become a testament to your remarkable taste and elevate your culinary space to new heights of individuality and unparalleled beauty.
8. Beige and white
Unveiling the Harmonious Blend: Embrace the Vastu Way with White and Beige Kitchen Laminates for an Enchanting Culinary Space
Step into a world where design principles meet positive energy, and where the fusion of aesthetics and spirituality creates a truly enchanting kitchen. Delve into the wisdom of Vastu as we explore the remarkable two-colour combinations of white and beige kitchen laminates—a pairing that not only captivates the eye but also attracts positive energy and establishes a harmonious connection with the natural elements.
Embrace the purity and serenity of white as it graces your kitchen space. This color symbolizes tranquility and openness, infusing your culinary haven with a sense of calm and clarity. As light dances upon the white laminates, a soothing ambiance permeates the air, inviting positive energy to flow freely and effortlessly.
Complementing the purity of white, beige emerges as a warm and earthy tone that connects your kitchen with the natural elements. Like soft sand beneath your feet, the beige laminates ground the space, creating a sense of stability and balance. Its subtle hues evoke a feeling of comfort and harmony, bridging the gap between the material and spiritual realms.
In the realm of Vastu, this exceptional combination of white and beige is regarded as not just visually appealing, but also spiritually uplifting. It aligns your kitchen with the principles of energy flow and invites positive vibrations to harmonize with your daily culinary activities. As you navigate through your kitchen, you’ll feel a deep connection to the natural elements, fostering a sense of peace and well-being.
Immerse yourself in the tranquility and positive energy that emanates from the white and beige laminates. Allow this remarkable combination to envelop your kitchen, creating a sanctuary that nourishes your body, mind, and soul. Let the principles of Vastu guide you as you embrace the beauty of this two-color blend and experience the profound impact it can have on your culinary space.
As you embark on this journey, let the white and beige laminates become more than just a design choice—they become conduits of positive energy and connections to the natural world. Embrace the transformative power of this Vastu-inspired combination and create a kitchen that is not only visually stunning but also a sanctuary of balance and harmony.
9. Red and yellow
Ignite the Culinary Playground: Embrace the Dynamic Duo of Radiant Yellow Cabinets and Fiery Red Surfaces for an Unforgettable Kitchen Experience
Are you ready to turn your kitchen into a vibrant playground of culinary delight? Get ready to inject a dose of fun and excitement into your cooking haven by opting for the captivating combination of bright yellow cabinets and eye-catching red surfaces. Let the colors take center stage as they transform your kitchen into an unforgettable space that sparks joy and unleashes your inner creativity.
Picture your cabinets adorned in a lively shade of bright yellow—a hue that radiates warmth, positivity, and endless possibilities. As sunlight streams through your kitchen windows, it illuminates the yellow laminates, creating a cheerful and energetic ambiance that sets the stage for culinary adventures. Each time you step into your kitchen, you’ll feel a surge of inspiration and enthusiasm, ready to embrace the joy of cooking and experimenting with flavors.
Now, shift your attention to the horizontal surfaces, where fiery red laminates make a bold statement. This vibrant color choice adds a fiery touch that ignites your senses and infuses your culinary space with passionate energy. The red surfaces become a captivating focal point, fueling your creativity and pushing the boundaries of culinary exploration. From chopping ingredients to presenting your delectable creations, every moment becomes an opportunity to revel in the vibrancy of your kitchen.
To balance the boldness of the yellow cabinets and red surfaces, opt for the lightest hues on your walls. Let them serve as a calming backdrop, allowing the dynamic duo to shine while maintaining a harmonious visual balance. The lighter tones create a sense of tranquility and ensure that your kitchen remains a space where your colorful creations can take center stage.
Embrace the uniqueness and playfulness of your culinary playground as you unleash your creativity and bring the combination of bright yellow cabinets and fiery red surfaces to life. Let your kitchen become a reflection of your zest for life and your passion for all things culinary. Every time you enter your kitchen, you’ll be greeted by a burst of energy that fuels your culinary journey and invites you to create masterpieces that tantalize the taste buds and delight the senses.
Embrace the dynamic duo of radiant yellow cabinets and fiery red surfaces, and let your kitchen become a haven of creativity, joy, and unforgettable moments. With every dish you prepare, you’ll infuse a dash of passion and a sprinkle of excitement, transforming your kitchen into a space that epitomizes your unique style and leaves a lasting impression on all who enter.
10. Teal and white
Unleash the Ocean’s Embrace: Immerse Your Kitchen in a Mesmerizing Fusion of Light Teal and Crisp White
Prepare to embark on a journey to the depths of tranquility as you transform your kitchen into a captivating oasis inspired by the vastness of the ocean. Picture a space adorned with the mesmerizing combination of light teal and crisp white, where every element is meticulously chosen to evoke the serenity of coastal bliss. Let the vertical elements embrace the allure of teal laminate, while the horizontal surfaces radiate a pristine white charm, creating a truly unique and enchanting ambiance.
Imagine the vertical elements cloaked in a delicate shade of light teal—a color that mirrors the captivating hues of tropical waters. As your eyes wander across the teal laminates, you’ll feel a gentle breeze whispering through your kitchen, transporting you to a seaside retreat. The teal invokes a sense of tranquility and relaxation, evoking images of sun-kissed beaches and endless horizons, infusing your culinary haven with a touch of coastal elegance.
Complementing the vertical elements, the horizontal surfaces radiate a crisp white brilliance that mirrors the frothy waves cascading upon sandy shores. The white laminates exude purity and freshness, reflecting the purity of light and accentuating the airy atmosphere of your kitchen. This pristine canvas creates a harmonious contrast against the teal, allowing the oceanic hues to shine and inviting a sense of calm into your culinary sanctuary.
Immerse yourself in the embrace of the ocean as you embrace the unparalleled fusion of light teal and crisp white in your kitchen. With each passing moment, you’ll be transported to a place where time slows down and worries dissipate, allowing your culinary creativity to flourish. Whether you’re sipping your morning coffee or indulging in a culinary masterpiece, your kitchen will become a sanctuary where the beauty of the ocean comes alive, nourishing your spirit and revitalizing your senses.
So, surrender to the allure of the ocean’s embrace and let its timeless beauty wash over your kitchen. Embrace the captivating fusion of light teal and crisp white laminates, and watch as your culinary space transforms into an oasis of serenity and inspiration. Unleash the power of the ocean’s enchantment and awaken a sense of tranquility that will accompany you on every culinary adventure, making your kitchen an extraordinary haven where the boundaries of imagination are limitless.
In conclusion, the captivating world of kitchen laminates offers an array of possibilities to elevate your culinary space to new heights. Through the unique combinations and color palettes explored in these articles, it becomes clear that the artistry of interior design knows no bounds. At dpod Studio, an esteemed interior design company based in Ahmedabad, we understand the power of laminates in transforming kitchens into extraordinary realms of beauty and functionality.
From the harmonious blend of white and beige that harnesses positive energy to the dynamic duo of bright yellow and red that infuses playfulness into your culinary adventures, each article has demonstrated the immense potential of laminates in creating truly remarkable kitchens. With our unwavering passion for interior design and a commitment to excellence, dpod Studio is poised to bring your kitchen dreams to life.
Our team of skilled designers is well-versed in curating unique colour combinations, optimizing space utilization, and incorporating laminates seamlessly into the overall design scheme. We take pride in understanding your individual style and crafting bespoke kitchen designs that resonate with your vision. With dpod Studio by your side, your kitchen will become a reflection of your personality and a testament to the artistry and innovation that defines our company.
By choosing dpod Studio as your interior design partner, you can expect an unparalleled level of dedication and attention to detail. We believe that every kitchen is an opportunity to create a space that inspires and nourishes, where cherished memories are made and culinary masterpieces come to life. Our expertise in interior design, combined with our deep understanding of laminates, allows us to create kitchens that seamlessly blend aesthetics with functionality, ensuring a harmonious and immersive experience for you and your loved ones.
So, take the first step towards transforming your kitchen into a realm of exquisite beauty and functionality. Contact dpod Studio today, and let our talented team of interior designers in Ahmedabad embark on a journey with you, creating a kitchen that surpasses your wildest dreams. Trust in our expertise, embrace our unique approach to design, and witness the magic that unfolds as dpod Studio brings your vision to life, one laminate at a time.
Discover the definitive guide to 3 BHK interior design costs in Ahmedabad. Explore detailed room-wise, scope of work. Find inspiration from real 3 BHK projects across various budgets, helping you create a unique and stunning interior design.
Embark on your 3 BHK interior design costs journey with confidence! Finding the perfect designer can be daunting whether it’s a new home or a renovation project. But fear not, discover expert guidance on determining your budget and making the most of your investment for a stunning transformation that exceeds your expectations.
Table of Contents
Embark on a transparent interior design journey with dpod studio. Our comprehensive guide on 3 BHK internal design costs provides city-wise, room-wise, and service-wise breakdowns to help you plan your budget effectively. Explore real 3 BHK interior design costs homes across various budgets, gaining exclusive inspiration that empowers you to make informed decisions for your dream space. Trust dpod studio to create a unique and tailored design experience.
What Influences 3BHK Interior Design Cost?
Crack the code to determine the cost of designing your 3BHK apartment. Identify the crucial factors that impact pricing, empowering you to make informed decisions about your interior design project.
Location: When it comes to interior design costs, cities like Ahmedabad command higher prices due to soaring real estate rates and increased expenses for materials and services. On the other hand, smaller towns like Nadiad offer comparatively lower costs. Factor in these location-based variations while budgeting for your 3BHK interior design project.
Size: Designing a larger 3BHK entails a higher cost. The scale and scope of the project, along with the need for more materials, furnishings, and intricate detailing, contribute to the overall expenses. Consider the size of your 3 BHK interior design costs while planning your interior design budget accordingly.
Valuation: In some instances, the interior design cost can be directly correlated to the property’s cost per square foot. Therefore, if your apartment comes with a higher price tag, it is likely that the interior design cost will also be higher. Keep this in mind when budgeting for your project.
Design Scope: The scope of your interior design project significantly influences the overall cost. Whether you’re seeking designs for your entire home or focusing on specific areas like the kitchen, the extent of work required will impact the final expenses. Consider the scope of your project to accurately estimate the cost of achieving your desired interior design goals.
Renovation vs New Property: Renovating a property often incurs higher interior design costs compared to designing a new property. Extensive civil changes and repair work can increase expenses significantly. Consider the scope of renovation and potential repairs when estimating the interior design cost to ensure accurate budgeting for your project.
Materials: The choice of materials and finishes for cabinets, furniture, and wardrobes has a significant impact on your 3BHK interior design cost. Opting for high-quality or luxurious materials can increase expenses, while more budget-friendly options can help reduce costs. Consider your preferences and budget when making material and finish selections for an optimal balance between aesthetics and cost.
Embarking on a new home design or renovation project? Unlock the essential knowledge of 3 BHK interior design costs with dpod studio. We’re committed to guiding you through the entire interior design journey, ensuring you have a comprehensive understanding of the costs involved from start to finish. Trust us to make your interior dreams a reality.
Embark on a design journey that suits your taste, be it standard, premium, or luxurious. Explore the room-wise 3 BHK interior design costs, enabling you to plan and budget accordingly. From living spaces to bedrooms and kitchens, discover the possibilities and create a captivating home that reflects your desired style.
Room
Cost for Mandatory-only 3BHK Design*
Cost for premium 3BHK Interior*
Cost for deluxe 3BHK Interior*
Kitchen
₹3,16,000 – ₹4,00,000
₹3,63,000 – ₹4,00,000
₹5,99,000 – ₹6,20,000
Living Room
₹2,71,190 – ₹3,19,604
₹3,56,362 – ₹4,18,618
₹4,44,599 – ₹5,19,459
Dining Room
₹1,200,42 – ₹1,25,307
₹1,57,132 – ₹1,63,128
₹1,91,040 – ₹1,98,404
Bedroom 1
₹2,72,438 – ₹2,82,220
₹3,28,887 – ₹3,39,711
₹4,72,031 – ₹4,85,439
Bedroom 2
₹2,72,438 – ₹2,82,220
₹3,28,887 – ₹3,39,711
₹4,72,031 – ₹4,85,439
Bedroom 3
₹2,72,438 – ₹2,82,220
₹3,28,887 – ₹3,39,711
₹4,72,031 – ₹4,85,439
Bathroom
₹71,752 – ₹89,976
₹86,313 – ₹88,914
₹92,339 – ₹92,513
*Discover your personalized interior design journey with us. Please note that the costs mentioned above serve as a reference point and may vary based on factors such as your location, the scope of work, and the size of your home. Connect with our experienced designer today for a complimentary quotation tailored to your specific needs.
Scope Details of Your 3BHK Interior Design Package
Uncover the visual possibilities of your 3 BHK interior design costs based on your specific requirements and the scope of work involved. We provide you with a comprehensive breakdown, allowing you to envision the stunning outcome tailored to your needs. Discover the art of transforming your space with our detailed design breakdown.
Explore cost breakdowns for 3 BHK interior design costs in both renovation and new home projects, providing insights for effective budget planning. Uncover the possibilities for your dream space:
3BHK Interior Design Renovation Cost Breakup
Scope of work
Cost Breakup*
Detailing of the entire house and removal of existing furniture
₹40,000/ to ₹50,000/-
Tiling work for floor and skirting work (cost may vary on cost of tiles)
₹1,80,000/- to ₹2,50,000/-
Electrical Work
₹2,00,000/- to ₹2,50,000/-
Single bathroom renovation (tiles and sanitary fixtures)
₹1,80,000/- to ₹3,00,000/-
False Ceiling
₹80,000/- to ₹1,40,000/-
Painting
₹107,000/- to ₹1,37,000/-
Window
₹1,18,000/- to ₹2,24,000/-
Furniture
₹6,00,000/- to ₹12,00,00/-
Curtains
₹1,10,000/- to ₹1,96,000/-
3bhk interior design cost of a new house
Scope of work
Cost Breakup*
False ceiling
₹80,000/- to ₹1,40,000/-
Painting
₹95,000/- to ₹1,25,000/-
Electrical Work
₹75,000/- to ₹90,000/-
Furniture
₹6,00,000/- to ₹12,00,00/-
Curtains
₹1,10,000/- to ₹1,96,000/-
*Discover the perfect interior design solution for your unique needs. Please note that the prices mentioned above are for reference only and may vary depending on factors such as location, scope of work, and home size. Connect with our designer today for a free quotation tailored to your specific requirements. Let’s bring your vision to life!
How much do you need to budget for 3BHK interior design labor cost?
Embarking on a new home design or renovating your existing one? Don’t forget to consider the labor costs involved. Typically, these costs are encompassed within the overall 3BHK interior design cost, whether it’s a minor upgrade or a significant transformation. Plan your project accordingly to ensure a comprehensive budgeting approach.
For a clearer understanding, let’s delve into the labor costs and the scope of work involved in your project. By examining these factors, we can provide you with a comprehensive overview of the tasks at hand and the associated costs. This will ensure transparency and help you make informed decisions about your 3 BHK interior design costs journey.
Scope
Price
GST
Painting
₹8 to ₹14 Per Sft
18%
False Ceiling
₹20 to ₹25 Per Sft
18%
Carpentry
₹200 Per Sft for Panelling work; ₹400 Per Sft for the Storage Work
18%
Total Labour Costs
₹400 to ₹600 Per Sft
18%
Please note that the costs provided are for reference purposes only. The exact costs for your 3BHK interior design project may vary based on factors such as your location, scope of work, and prevailing demand and supply dynamics. We recommend consulting with our team to obtain a customized quotation tailored to your specific requirements.
How Can dpod studio Help You?
Experience the assurance of a meticulously crafted interior design plan, accompanied by stunning 3D renders. Our team will bring your vision to life, providing you with a clear visualization of your 3BHK space before the actual implementation. Embrace the confidence of a well-designed plan that aligns with your style and preferences.
Rest assured, we never compromise on the quality of workmanship or materials used in your 3BHK interior design project. Our commitment to excellence ensures that no corners are cut when it comes to delivering superior craftsmanship and utilizing top-notch materials. Trust us to create a space that not only looks exceptional but also stands the test of time.
Count on our highly trained labor force to handle the most intricate and challenging designs and renovations with expertise. Our skilled professionals are equipped to tackle even the trickiest aspects of your 3BHK interior design project, ensuring seamless execution and exceptional results. Rest assured, your vision will be brought to life with precision and finesse.
If you aspire to create a home that exudes timeless beauty, look no further. Embark on your interior design journey by booking an online consultation with dpod studio today. Our expert team is eager to understand your vision and transform your space into a reflection of your unique style and taste. Let’s begin the transformation together.
Disclaimer: Please note that all information provided in this publication is accurate as of the time of publication. Costs, budgets, materials, finishes, and products mentioned, particularly those from the dpod studio catalog, are subject to change based on current market rates. For precise details regarding pricing and availability, we recommend speaking with our designer who will provide you with the most up-to-date information. Your satisfaction is our priority, and we are here to assist you every step of the way.
FAQs
1. Where to find top interior designers in Ahmedabad?
You can find Ahmedabad’s top interior designers at dpod studio, Step into a world of limitless possibilities with our interior design expertise. With over 2000 successful projects under our belt and a specialization in Ahmadabad, we proudly present a diverse collection of 2000+ one-of-a-kind designs to transform your space.
2. How much does a 3 BHK Interior Design cost in Ahmedabad?
Embark on an extraordinary journey of interior design in Ahmedabad! Our team brings your dream 3BHK to life with prices ranging from ₹12 Lacs to ₹25 Lacs, tailored to your specific requirements, size, location, and project complexity. Let’s create something remarkable together!
Experience extraordinary dining spaces redefined through artistic innovation. Discover the transformative designs of DPod Studio that push boundaries and create captivating works of art. Elevate your Dining Spaces experience to unprecedented levels of style and sophistication.
Bedrooms, living rooms, and balconies can be easily designed. But the kitchen is something that needs special attention. Based on multiple preferences of design, furnishings, space, and materials, we have brought you a variety of kitchen interior designs.
Table of Contents
1. Cabinet Color Trends
Choosing the right color trend for kitchen cabinets and drawers is inexpensive. It is the most subtle way to go about ideating a small kitchen interior design. Not only does it elevate the entire look & feel of the house, but also makes it enduring and timeless. From fun vibrant colors like orange, yellow, and peach to understated neutral hues like gray, tranquilizing blue, charcoal, olive, or mint. Playing by the kitchen cabinet colors is also one of the easiest ways to revamp your kitchen outlook with the existing style.
2. Bold Elements
Now that you have decided on the color of the interior modular kitchen, it’s time to add some texture, style, and appeal with bold elements and structure. Be mindful to match the rest of your interior design theme and choose the style that fits best. For instance, wooden floors, fiery cabinets, eye-catching backsplash, light arrangements, and serene surfaces are some of the interesting features of middle-class kitchen interior design.
3. L-Shaped Faucet With Sink
From the era of round, vintage, to rectangular, kitchen interiors have evolved to a large extent. The new trend points to L-shaped faucets with a sink. It gives an elegant and classic touch to the entire look & feel of your kitchen. The slim fixtures give a minimalist makeover leaving a charming yet clutter-free appearance.
4. Minimal Kitchen Styles
One of the best kitchen interior design ideas involves a setup where everything appears to be compact and sleek. These structural elements with matte seamless finishes, clean lines, and smooth surface sum it up well to take your kitchen interiors to the next level. Kitchen interiors with a minimalistic design style ensure everything is in a hidden view with no crowded storage or negative alignments, basically, a setup to keep all the pots and pans out of visibility.
5. Smart Kitchens
When the whole world runs through tech, why not inculcate it in our kitchen designs too? More or less it makes the hassle of cooking and managing a kitchen way easier. A good size of functional drawers and shelves with conveniently placed appliances improves kitchen efficacy. Using appliances with smart technology, touch-top-open cabinets, and accent lighting elements are dominant when it comes to smart kitchen arrangements. No wonder, it is the most contemporary kitchen interior design trend of 2024.
6. Open Kitchen Concept
Be it semi-modular or modular kitchen design trends, open kitchens always vibe trendy. No matter the cozy, rustic, or sleek kitchen interior design idea, open kitchen layouts match every theme. If you are looking to plan a 2BHK flat kitchen interior design, this is the most space-efficient, affordable, and organized kitchen design idea.
7. Indian Parallel Kitchen Interior Design
Coming to the most clever and space-friendly kitchen interior that has been in the buzz for years now is parallel kitchen interior design. This design is accompanied by open and closed cabinet fixtures to arrange the cooking essentials in the most organized and barely visible manner. This has been the savior for traditional Indian apartments which are usually less spacious.
8. Kitchen Interiors With Alluring Countertops
Countertops are the center of attraction for any modern kitchen interior design. In the era of modular kitchen design trends, there are a variety of countertops when it comes to shapes, sizes, and textures. They seemed to be extra but add a lot of character to your kitchen. If you’re really willing to spruce up your kitchen interiors with luxury and style, there’s nothing like countertops!
How Can Dpod Studio Help You?
We hope you love the budding kitchen interior design trends for 2024. From french industrial styles, Indian parallel kitchen interiors, and space-efficient designs, to fully integrated smart kitchens — we have got you covered!
If you’re looking to find out the kitchen interior design cost, please fill in the contact form and one of our interior design consultants at will get back to you.